Mini Banana Cakes with Banana Cream Pudding and Nutella Drizzle

Mini Banana Cakes

THIS cake. I’m ALL about it.

Just look at it. Wouldn’t you be all about it?

I’m pretty sure you would be.

It’s so mini,
andd so cute,
anddd so darn delicious.

And, GAHHH.

You’ll have to excuse me here. I just can’t help the gushing. This is my favoritest—let’s pretend that’s a real word—recipe I have ever, EVER, posted on the blog. I’m so ridiculously proud of it, guys!

You’ll cut me a little slack on the excessive gushing, right?

Perfect. I knew you would.

Now back to cake talk.

Mini Banana Cakes

I don’t know if you’ve noticed, but the cake section on the blog is seriously lacking. As in, I have five cake recipes. FIVE. Can you say embarrassing? Don’t worry I’m saying it for you.

It’s not like I hate cakes either. It’s just, well…they aren’t my favorite thing to make. And, by that I mean I kind of hate making them.

Does that make me weird? Maybe, but I do have a reason. A realllly good reason.

The only time I make cakes are for birthdays. Everyone needs something to stick their candles in, and I sort of made it my job to give people the best birthday cake EVER. Already, I’m sure, you can see the pressure I’m putting on myself. I start off by taking flavor requests—chocolate, coconut, caramel, fruit-filled—and then I plan out my recipe. In theory, it should all work out.

But, in my reality, it never does.

Never.

Partly because I’m a perfectionist.

Partly because I usually get rushed by people that want cake.

And, partly because I have bad luck with cakes—if you ask my brother, however, he’ll tell you I just can’t make ’em.

Mini Banana Cakes

I’ve made cakes where the flavor is spot on, but the presentation is off. I’ve made dry cakes, burnt cakes, I’m-about-to-cry-because-this-looks-so-bad cakes, and I could go on, but I’m pretty sure you get the picture. Don’t get me wrong, I do make my fair share of successful birthday cakes, but it’s the bad ones that haunt me. Bad cake dreams, anyone? And, I always feel like if the cake is off, or doesn’t quite meet my perfectionist standards, I’ve ruined the person’s birthday. I know, how dramatic.

Oh, and all those successful cakes never seem to get photographed, hence the lack of cake recipes on the blog.

EXCEPT for this cake.

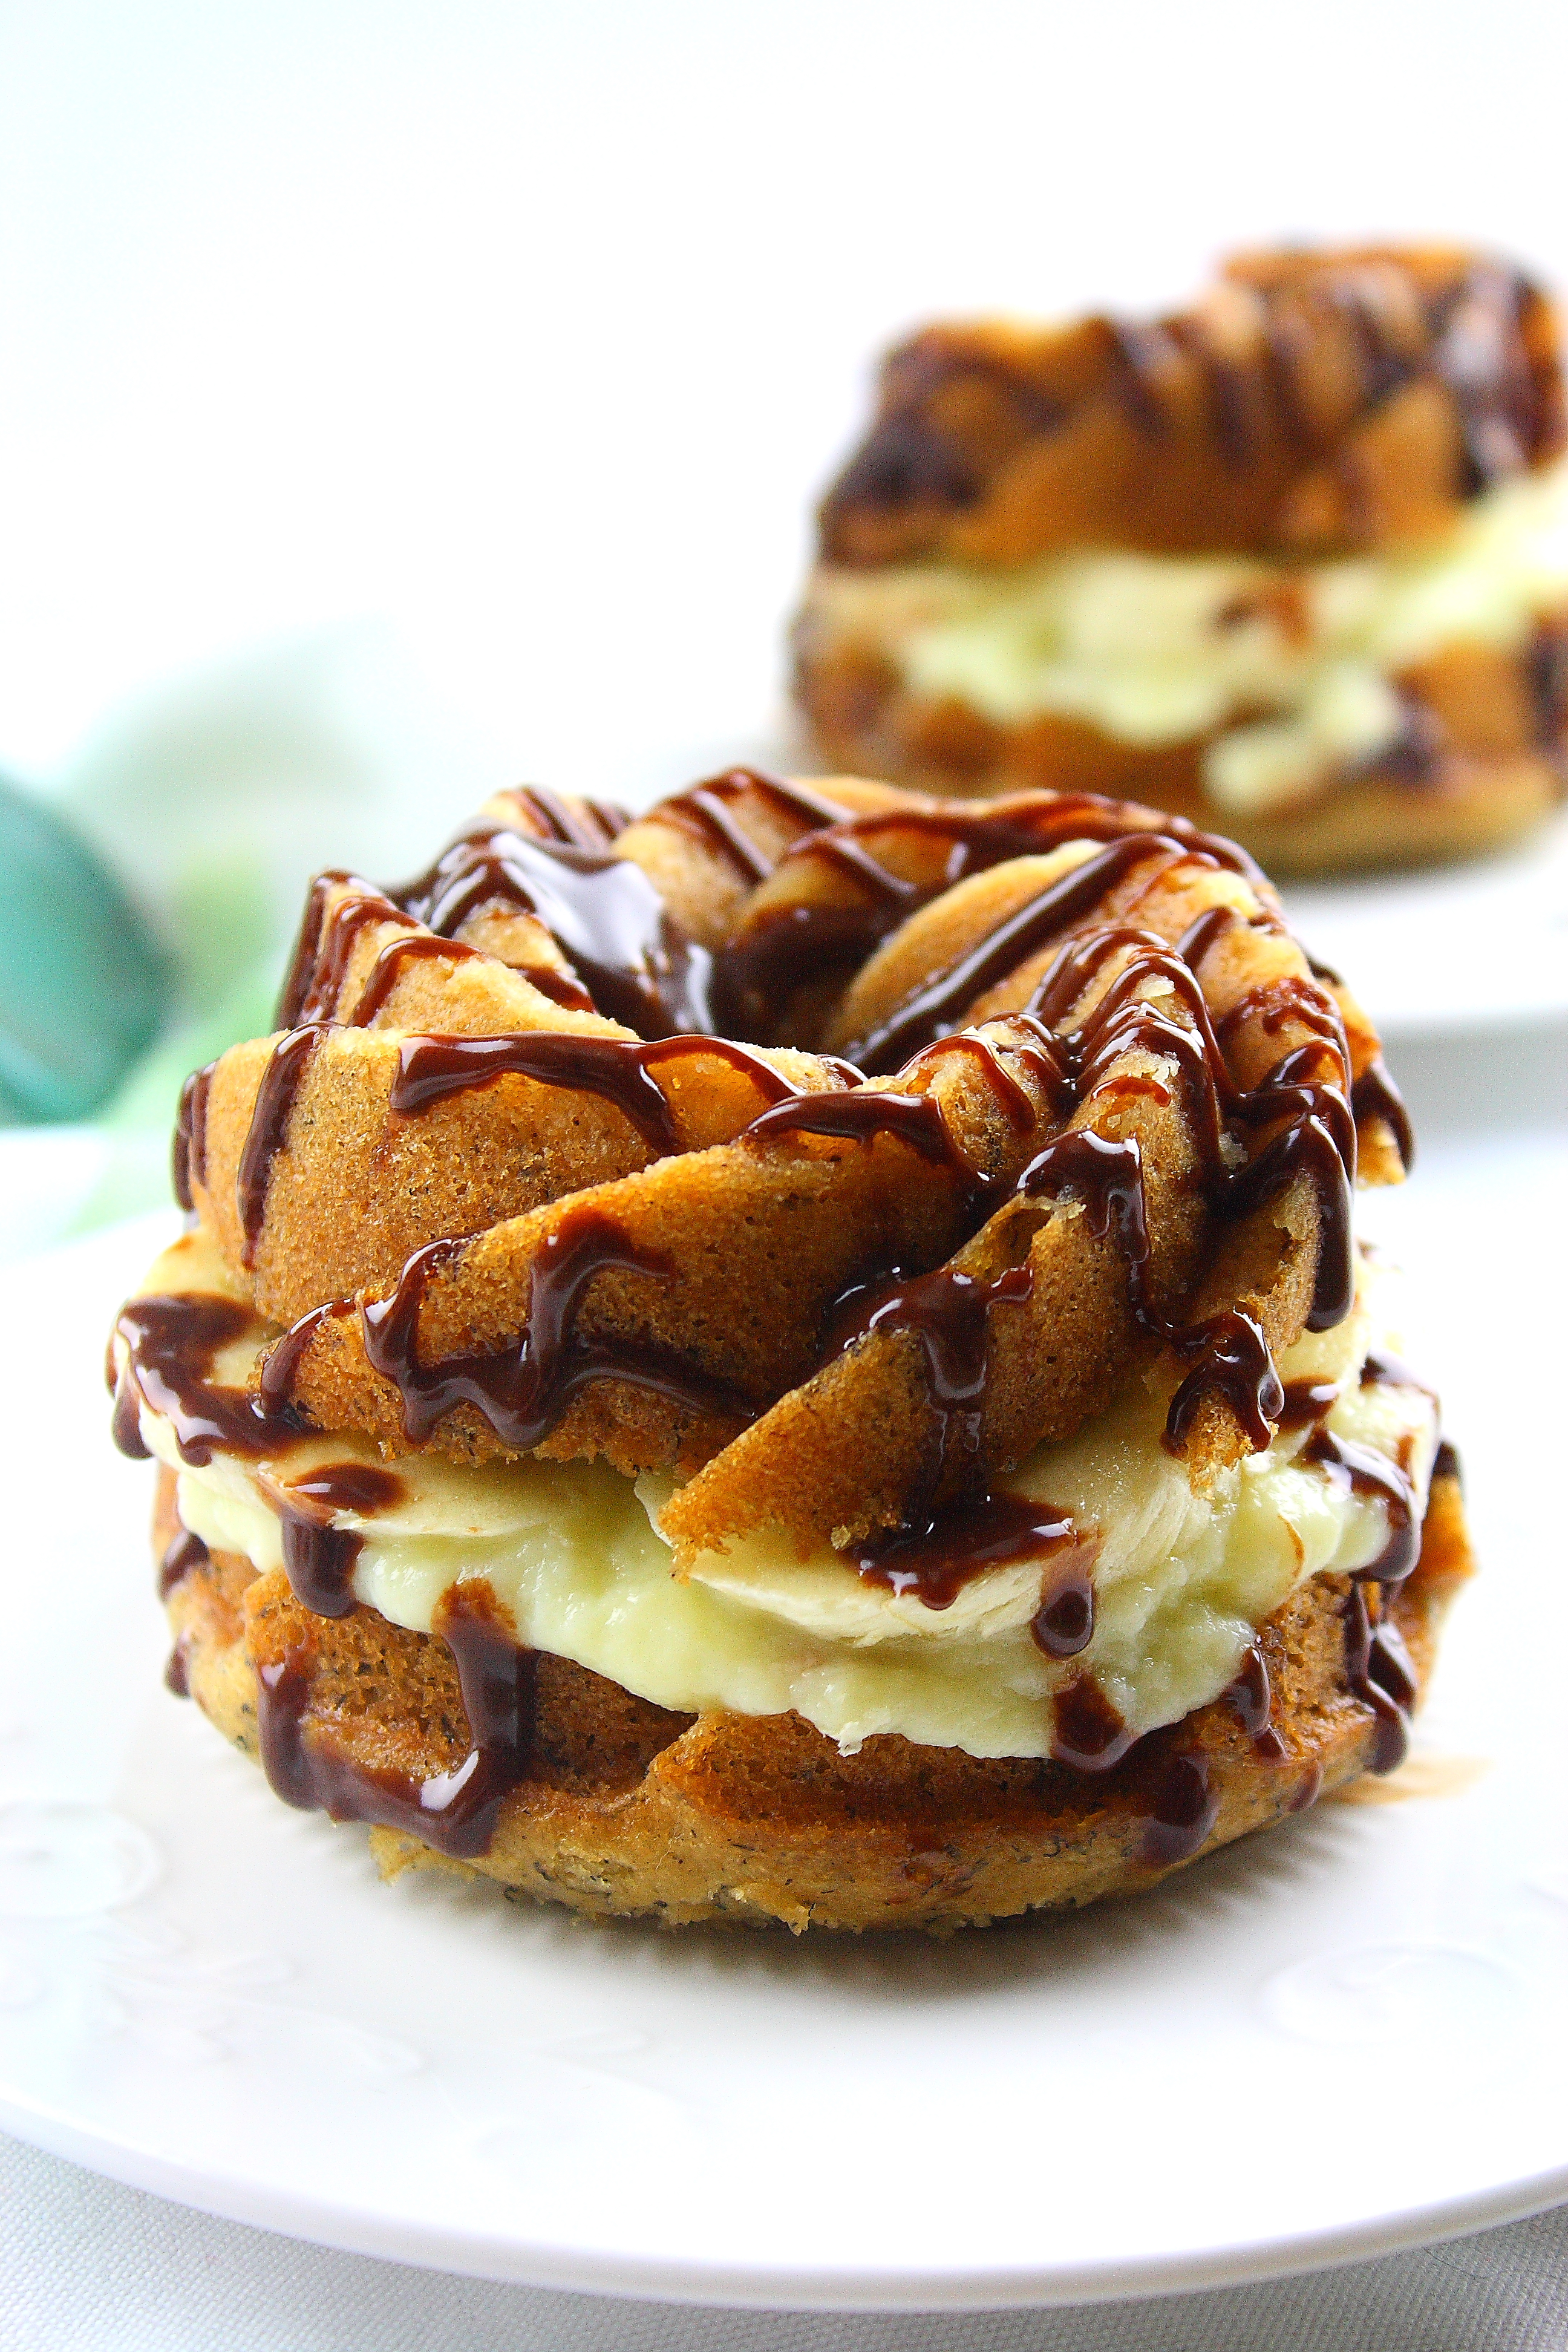
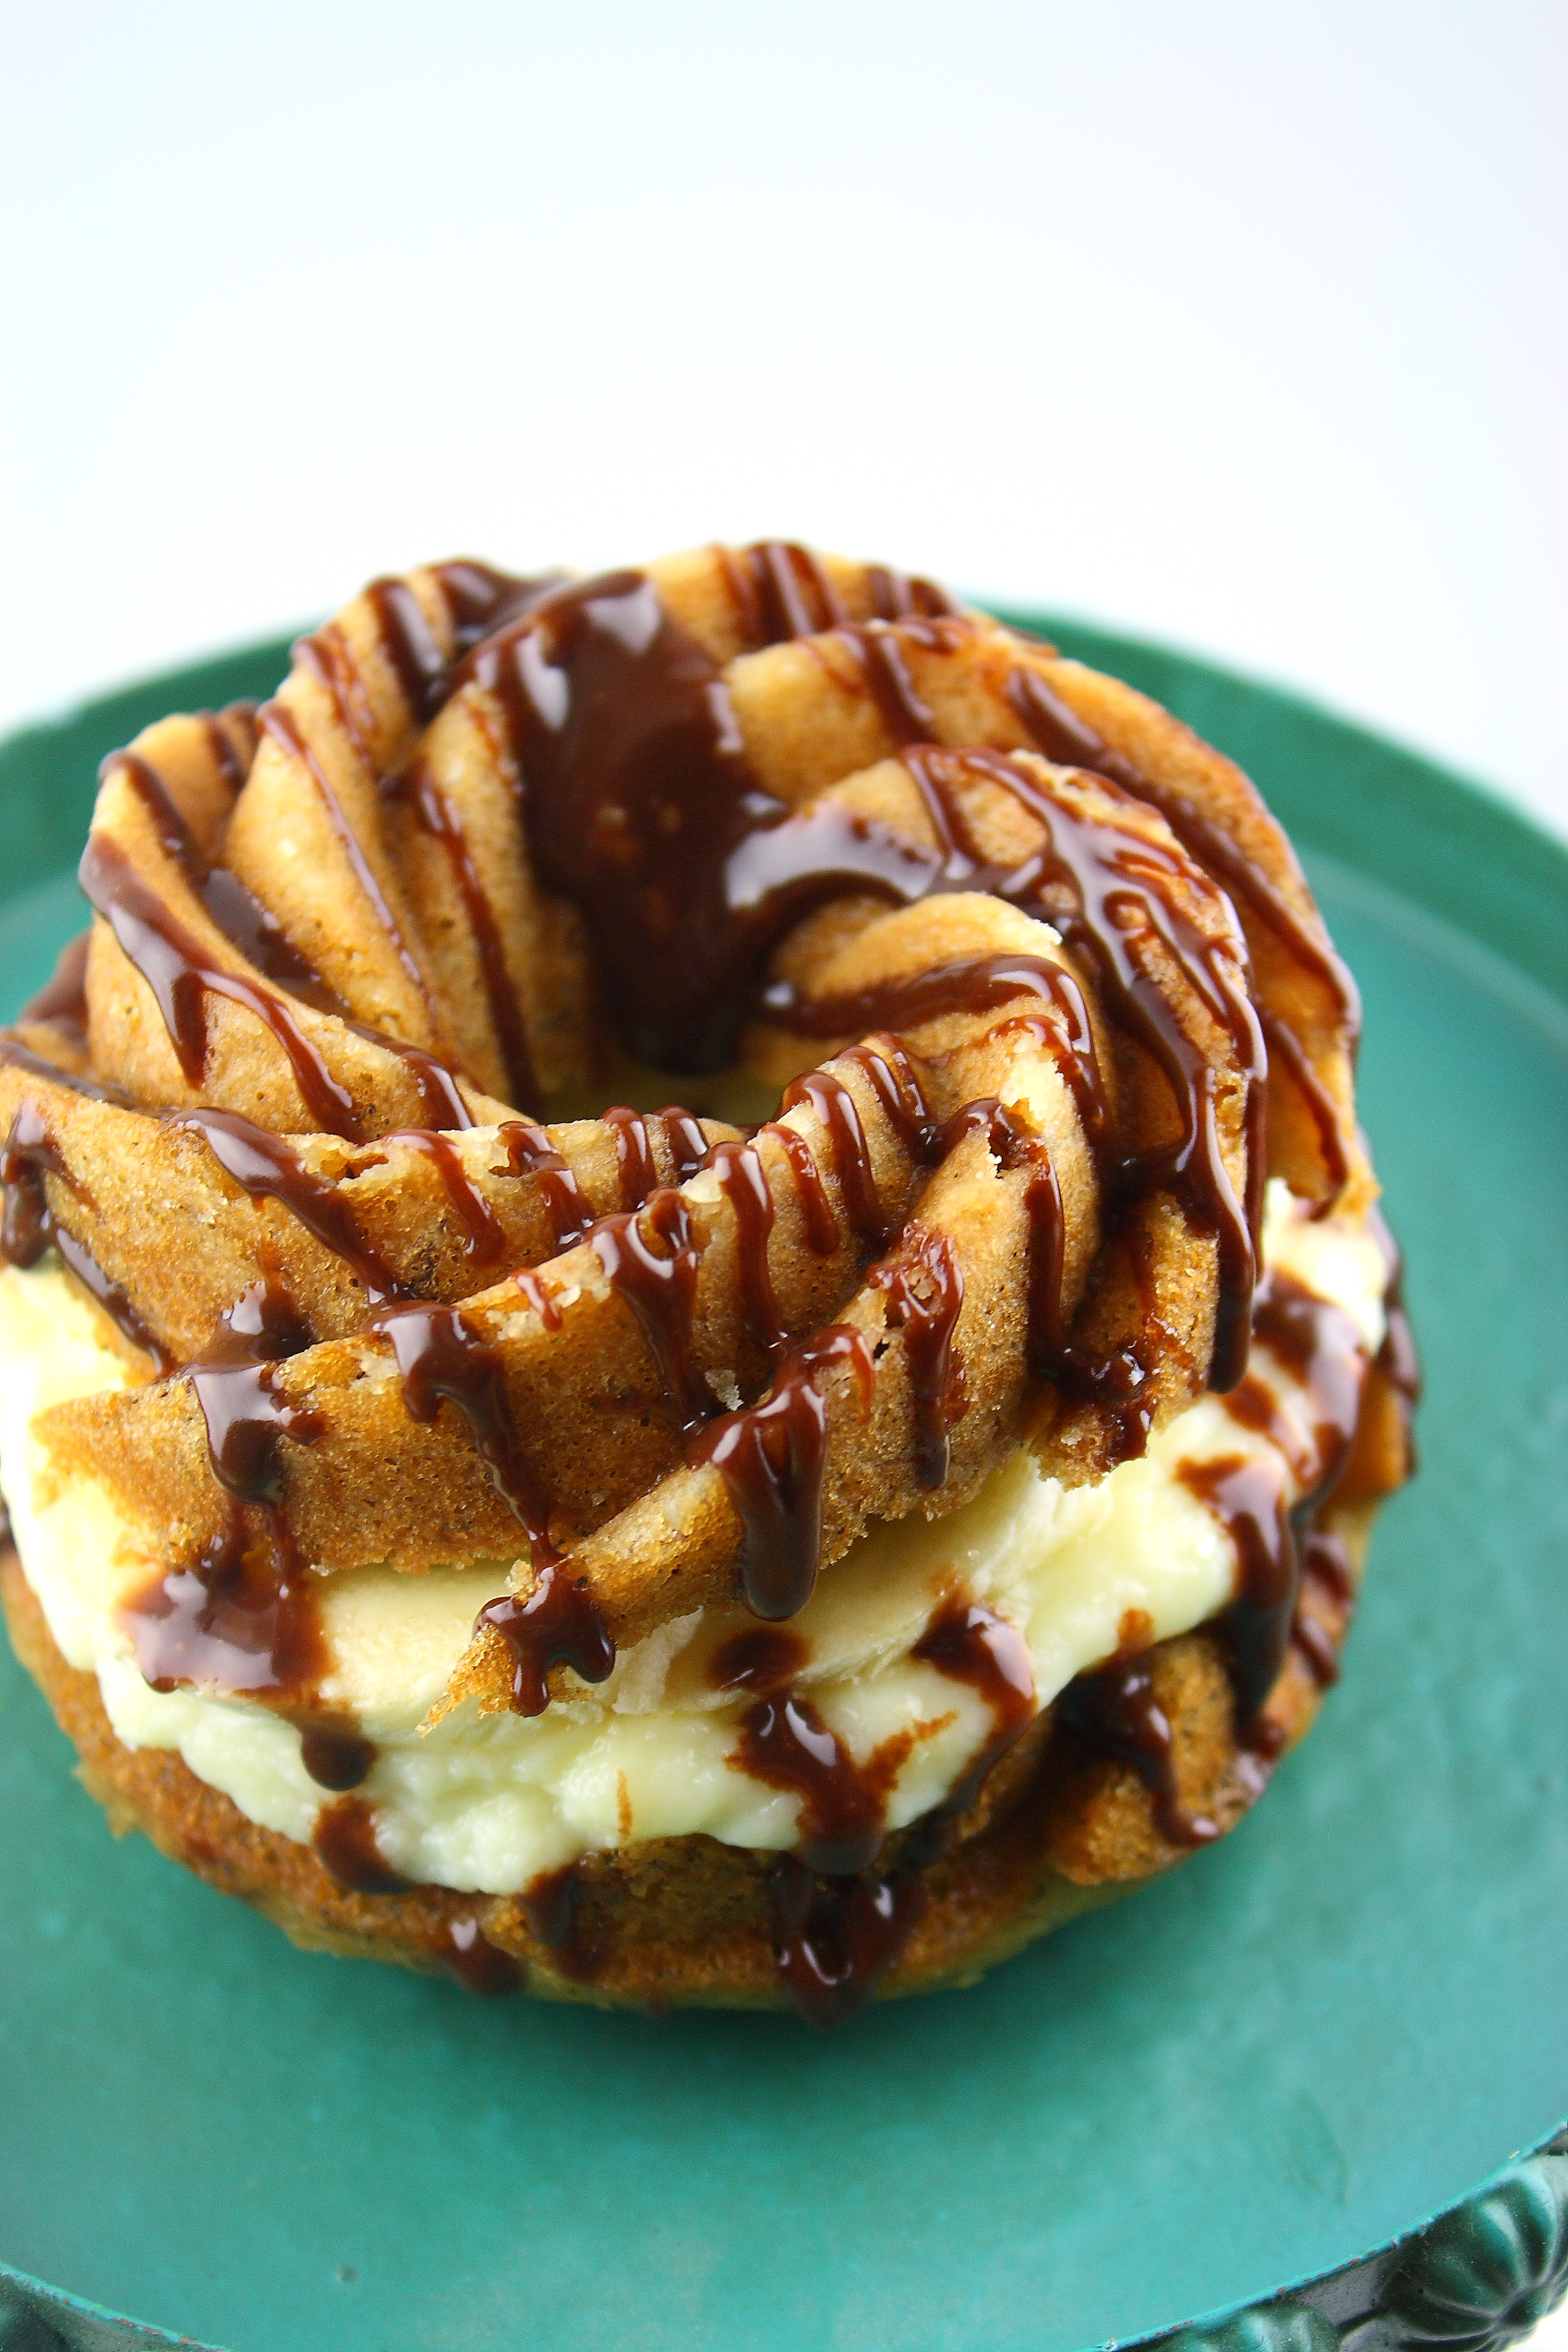
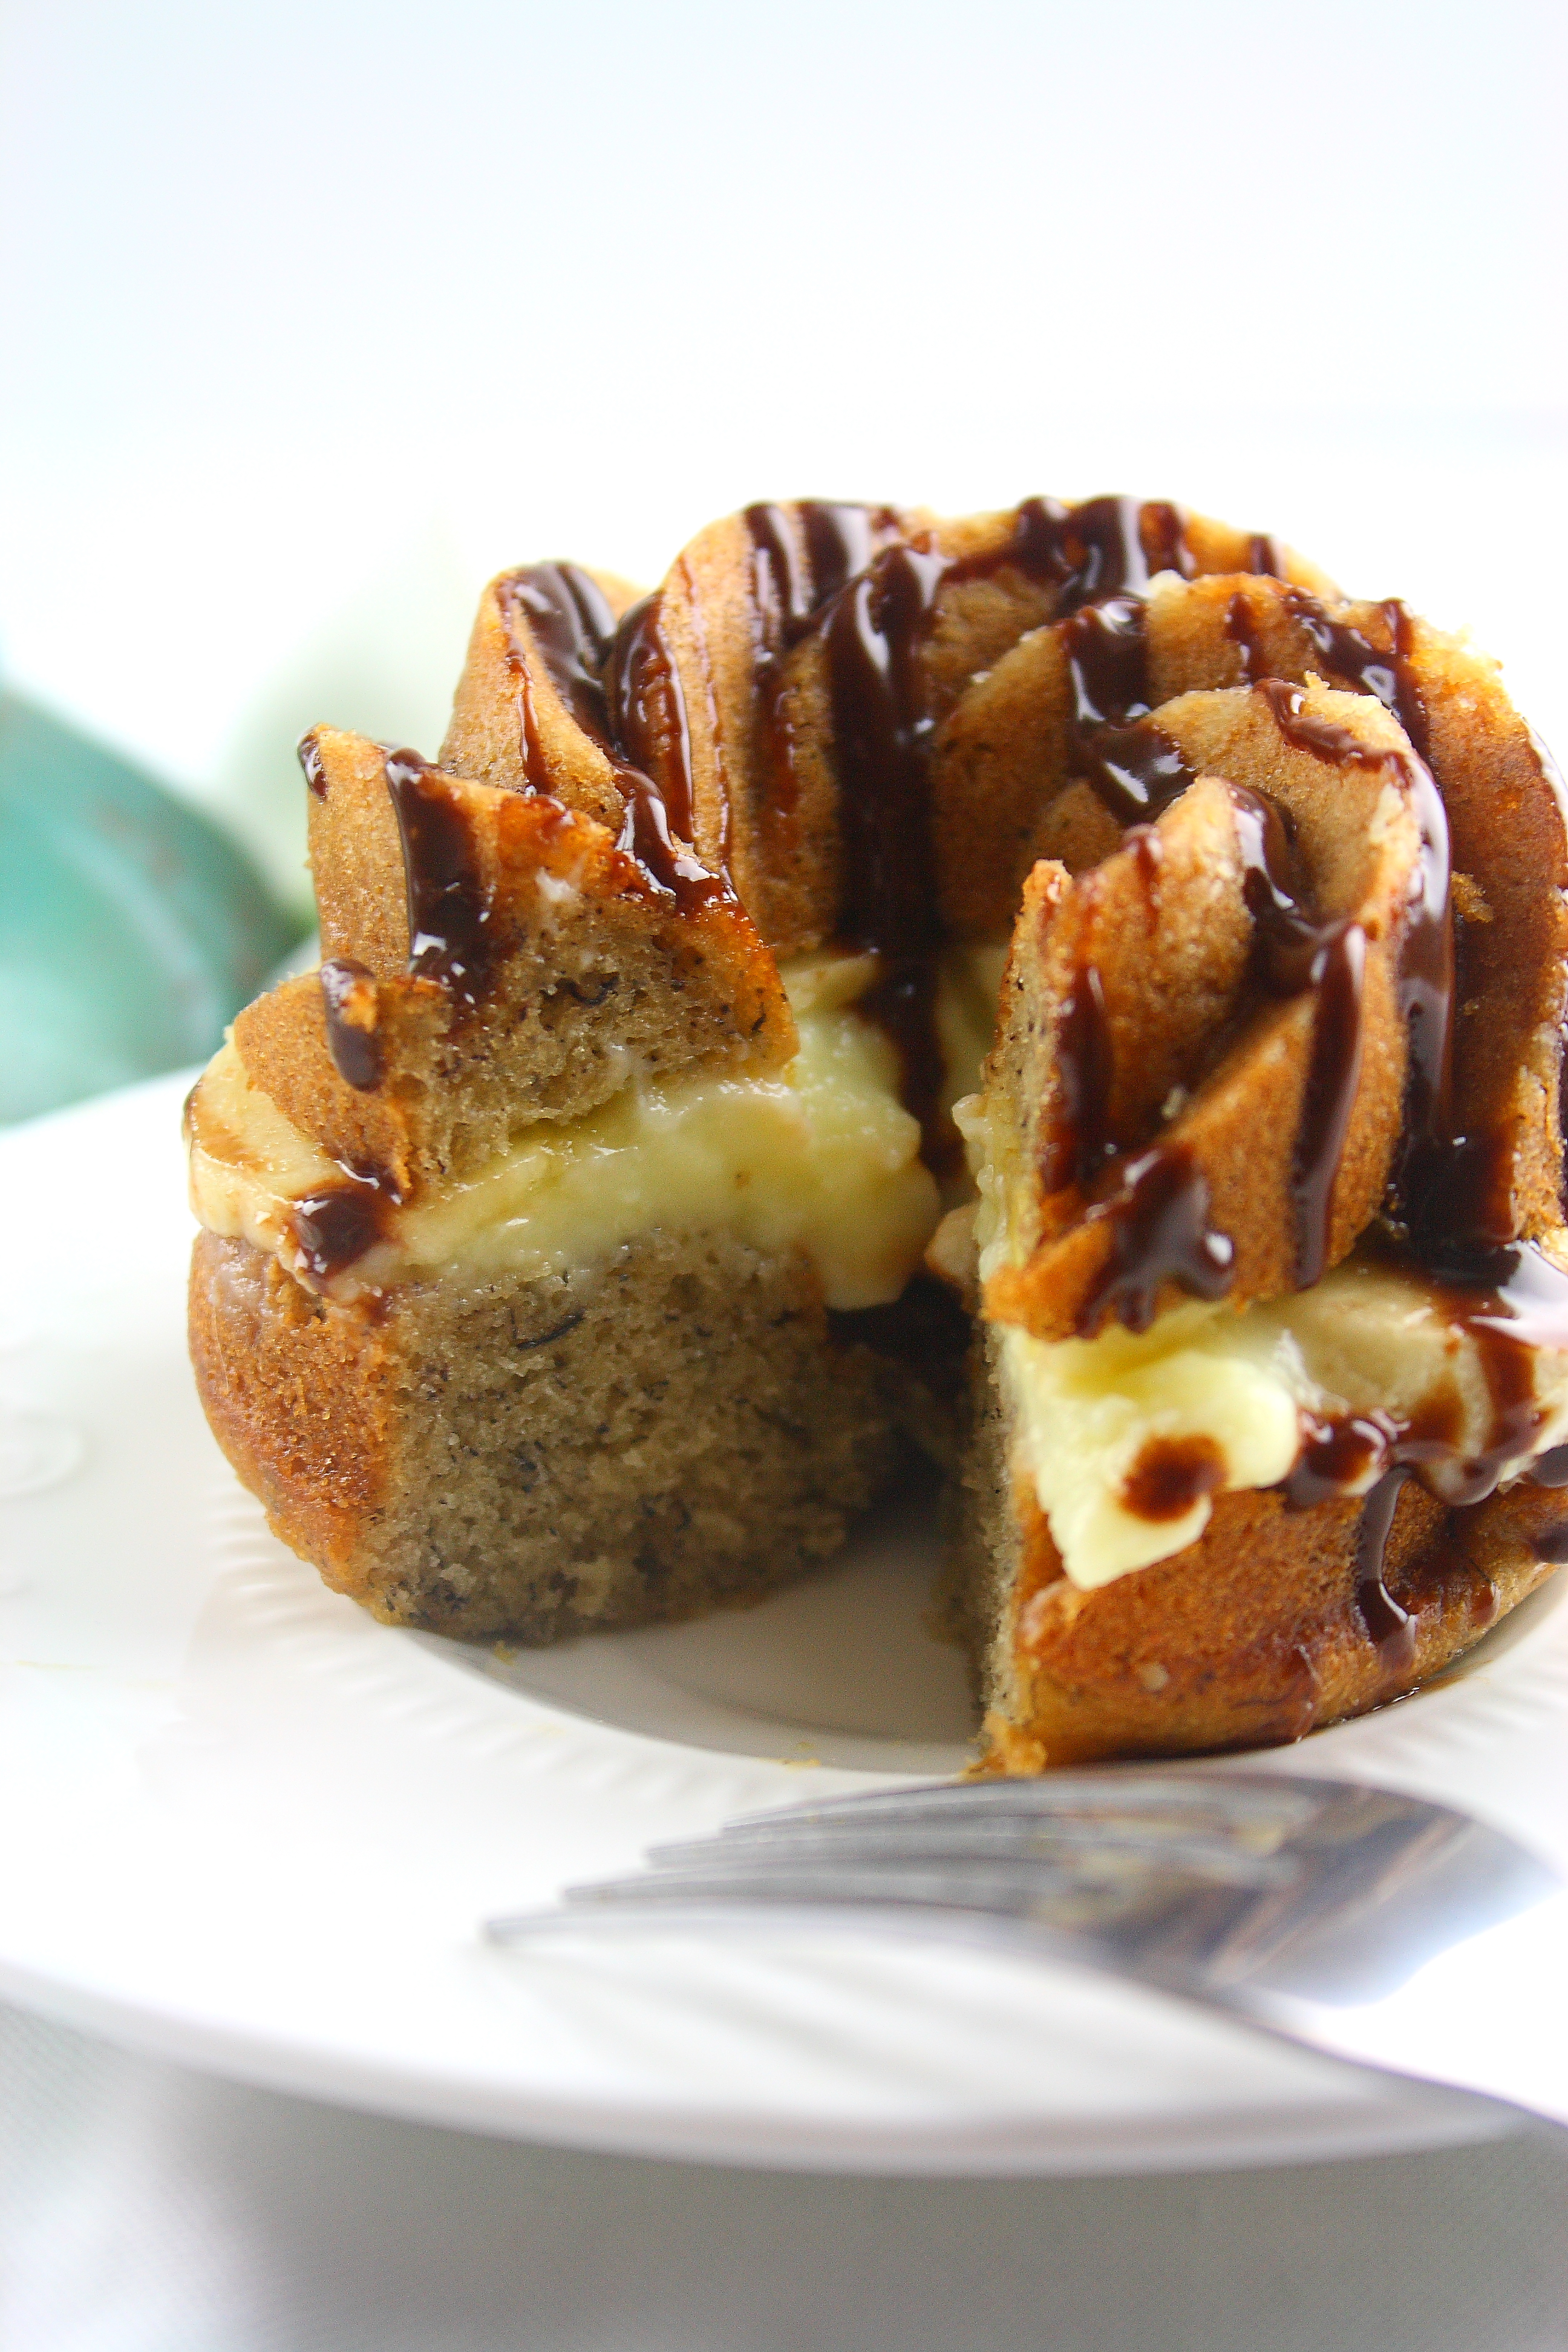
This beautifully delicious mini banana cake filled with banana cream pudding and drizzled with nutella.

That title, right? So, so much perfection. I can’t even. I may be shedding tears of joy right now.

Mini Banana Cakes

Are you wondering whose birthday inspired these little beauts? My friend Kp. He requested—more like I had to drag out of him because he’s too sweet to request a birthday cake—a plain vanilla cake with banana filling. Guys, remember when I said I like to give people the kind of cake they want? Well, sometimes, I like to have creative freedom.

Plain vanilla was just too…plain.

He deserved better. It was his birthday! I couldn’t just give him something so boring (sorry, vanilla lovers of the world!). So, the vanilla cake went out the window.

And, I’m so glad it did.

Mini Banana Cakes

Banana is the name of the game here.

Super, super, moist banana cake layered between a banana cream pudding that I had to stop myself from face planting in. Seriously, this pudding has the perfect amount of banana flavoring and is oh so ridiculously creamy. Did I mention the banana slices? The middle of each mini cake has banana slices on top of the banana cream pudding. I don’t think I could have packed more banana flavor in here if I had tried.

And, then there’s the nutella drizzle. Why? Because no (banana filled) birthday is complete with out it.

I want to keep gushing, but I don’t want to overwhelm you.

So, I’ll stop.

Mini Banana Cakes

But, I will say, you absolutely NEED to make these.

Like now.

RIGHT NOW.

Even, if you don’t have a birthday to celebrate.
Just do it.

Mini Banana Cakes with Banana Cream Pudding and Nutella Drizzle

Ingredients:
Banana Cakes
1/4 cup unsalted butter, softened
1 1/3 cups sugar
2 eggs
1 cup sour cream
1 1/2 cups (about 3 large bananas) mashed bananas
2 teaspoons vanilla
1 teaspoon baking soda
1/2 teaspoon salt
2 cups all-purpose flour

Banana Cream Pudding*
1/2 cup + 2 tablespoons sugar
3 tablespoons cornstarch
1 egg, room temperature
1 egg yolk, room temperature
2 cups whole milk
3/8 teaspoons Lorann Banana Cream Flavor Oil
1/4 teaspoon kosher salt
3 tablespoons unsalted butter

Assembly & Nutella Drizzle
4 to 6 bananas (depending on size), sliced
1/4 cup nutella
1 to 2 teaspoons of water, optional

Directions:
Banana Cakes
Preheat oven to 350 degrees. Grease and flour each well of the mini cake pan (or, baking dish of choice). Set aside.
In the bowl of an electric mixer fitted with the paddle attachment cream together butter and sugar until fluffy. Mix in sour cream and eggs, scraping the sides of the bowl when needed. Add mashed bananas and vanilla. Mix until combined. Stir in flour, salt, and baking soda until batter comes together.
Pour batter into prepared pan—about 3/4 of the way up—and bake for 12-15 minutes or until a toothpick inserted into the center comes out clean. Allow cakes to cool, in the pan, for 10 minutes on a wire rack. Using a small spatula gently pull away the sides of the cake from the pan to make sure they aren’t sticking. Invert the pan using a wire cooling rack and gently lift the cake pan up. Allow cakes to cool on the rack completely. Once cooled, cut cakes in half using a sharp knife (or, cake cutting tool).

Banana Cream Pudding
In a medium sauce pan, combine sugar, cornstarch, egg, egg yolk, banana cream oil, milk, and salt over medium heat. Whisk together until combined, then continue whisking for about 9-11 minutes or until pudding begins to thicken and bubble (you’ll know it’s done when the bubbles start making ‘plopping’ noises). Remove from the heat and whisk in butter until melted—at this point taste your pudding, if you think you want a little more banana flavor add another 1/8 of a teaspoon, but keep in mind as the pudding sits the banana flavor will intensify immensely. Pour pudding into a bowl and allow to sit in the fridge for 30 minutes or until set and cool to the touch.

Cake Assembly
Once pudding has cooled, transfer it to a piping bag with a large tip. Pipe a decent amount of pudding on to the bottom layer of the cake. Top with sliced bananas. Place the top half of the cake on the banana slices and gently press down. Drizzle the tops of each cake with nutella—I wanted a thinner nutella glaze, so I whisked in some water to make it easier to drizzle, but if you don’t want a thin glaze, just drizzle the nutella as is on the cakes.

NOTES:
*I made the pudding a day in advance and let it sit in the fridge overnight.
Cake recipe from Cooking Classy
Pudding recipe slightly adapted from The Crepes of Wrath

Mini Banana Cakes

Advertisement

Pineapple Mimosa Granita with Vanilla Ice Cream

Pineapple Mimosa Granita

It’s true.

I’m in love. Complete and utter love.

GUYS, I’ve never felt this way before.

Do you know about granita? ‘Cause it just walked into my life. And, I know this may be soon, but I’m never letting it go.

Never, ever, EVER.

I know, how clingy of me.

IMG_5355-2

I don’t know how I survived this long without knowing about it. It’s so simple. It’s so genius. It’s so damn delicious.

Quick lesson for those that may not know about it. It’s a semi-frozen dessert made from sugar, water, and flavoring of your choice. Think snow-cones here. Except, you don’t have to leave your house to get it. All you need is a freezer. Pretty simple huh?

But wait, it doesn’t stop there.

Think boozy snow-cones. Then think boozy shaved ice on top of ice cream.

Can you imagine anything better?

Neither can I.

IMG_5396-1

I really owe Honestly Yum a huge thank you. That’s how I met granita. When I saw the recipe for Red Wine Granita with Vanilla Ice Cream, I knew I had to make it. Except not with red wine. Fun fact: I’m not a red wine fan.

But, the good thing about granita is that it’s versatile. You can match any flavors you want and it’ll still taste good.

Now that’s a recipe that caters to your tastes. See, why I’m in love?

Pineapple Mimosa Granita

I’m really into mimosas. It’s my go-to drink at brunch. What’s not to love about them? A little a lot of bubbly, a little orange juice, and ta-da you have a drink. Except, I like my mimosas with pineapple juice. Please tell me you’ve tried it. It’s absolutely life changing.

Seriously, try it.

In fact, drink one while you wait for your granita to freeze up. That’s the one thing about making granita. There is a lot of waiting time. The whole process takes about 4 to 5 hours. Don’t let that be the reason you don’t make this though. It’s honestly one of the simplest and easiest recipes I’ve ever shared on the blog. And, as of now, it’s also my favorite recipe.

Pineapple Mimosa Granita

So, Pineapple Mimosa Granita with Vanilla Ice Cream. What does that mean exactly?

It means at the bottom you have a layer of vanilla ice cream, in the middle you have a layer of pineapple granita, and on the top you have a layer of champagne granita.

Oh, lets not forget the little pineapple wedge.

It’s trying to look nice for you.

How sweet, huh?

Pineapple Mimosa Granita

Pineapple Mimosa Granita with Vanilla Ice Cream
Recipe adapted from Honestly Yum

Ingredients:
Pineapple Granita
18 oz of pineapple juice (I used 2 pineapple juice cans from Trader Joe’s)

Champagne Granita
1/2 bottle champagne (I used a brut)
1/3 cup sugar
1 cup water

For Assembly
1 pint of vanilla ice cream
pineapple, for garnish

Directions:
Pineapple Granita
Pour pineapple juice in a shallow baking dish. Place in the freezer and after one hour scrape the ice crystals forming on the side of the pan with a fork towards the center. Repeat every hour until flaky (think shaved ice consistency). Should take about 3 to 4 hours total–it’ll vary based on your freezer.

Champagne Granita
Pour 1/2 bottle of champagne in a shallow baking dish. In a small pot, heat water and sugar, stirring frequently, until sugar has dissolved. Add sugar-water mixture to the baking dish and combine with the champagne. Place in the freezer and after one hour scrape the ice crystals forming on the side of the pan with a fork towards the center. Repeat every hour until flaky (again, think shaved ice consistency). Should take about 4 to 5 hours total.

Assembling Dessert
Place a scoop of vanilla ice cream in a small glass and top with a heaping layer of the pineapple granita, followed by a heaping layer of champagne granita. Garnish with a pineapple wedge.

In sum, pineapple + champagne + shaved ice + ice cream =

TRUE LOVE.

Pineapple Mimosa Granita

Mini Chocolate Fudge Donuts

Mini Chocolate Fudge Donuts

Donuts.

That’s the answer.

It’s the only possible solution to the problem.

Wait a minute. I messed that up, didn’t I?

I forgot to even ask the question. Insert monkey emoji here.

You know, the one where the monkey sees no evil so it’s covering its eyes. Yeah, that one. I would totally send you that right about now. But, we aren’t texting, so, let’s settle on saying: Ooops. Ohhh, or, even better, palm to the face. Or, palm to my face to be more exact. Sorry guys, I’m off my game day today. And, being all rambley, which apparently isn’t a word, but it should be, but… okay, I’ll stop now.

Iwilljustshutmyselfupwithadonutorseven. You didn’t catch that, right? Perfect.

Mini Chocolate Fudge Donuts

Annnnnyways, let’s try this again.

How do we survive the mid-week blues?

Come on, I know you know the answer.

Donuts you say? Why, yes, you are correct? It’s almost as if you read my mind.

I have the smartest internet friends.

Mini Chocolate Fudge Donuts

Why donuts? Better question, why not donuts?

Donuts equal happiness. It’s that simple. I mean, can you actually name a person who doesn’t like donuts?

Probably not. And, even if you can, I guarantee if they ate the right donut, the perfectttt donut, they would love it.Because, I repeat, donuts = happy. And, honestly I’m at a loss as to why they don’t teach us that formula in math. It seems like a no-brainer to me. Right?

So, Mini Chocolate Fudge Donuts.

Umm, yes please.

Mini Chocolate Fudge Donuts

I love days that start with chocolate cake, I mean, donuts for breakfast. What? Come on. You know we can’t only occasionally shouldn’t eat cake for breakfast. It’s just not a thing people do. Well, most people. And, I get it, I do, but sometimes Wednesday’s call for extra sweetness.

So, yes, these donuts taste like a chocolate cake lovers dream, but they are one hundred percent donuts. I repeat, donuts. Moist, cakey, soft chocolate donuts with milk chocolate chips dipped in hot fudge sauce and covered with an excessive amount of chocolate sprinkles. Seee, totalllly a donut. A decadent one, but still, a donut.

And, since it’s a donut, it’s totally acceptable to eat five for breakfast, which isn’t as much as you think considering they are bite size.

Mini Chocolate Fudge Donuts

That’s my story and I’m sticking to it.

Mini Chocolate Fudge Donuts
Donut recipe slightly adapted from Buns In My Oven
Yields: about 16 mini donuts

Ingredients:
1 cup all-purpose flour
1/2 cup granulated sugar
1/4 cup unsweetened cocoa powder
1/2 teaspoon baking soda
1/2 cup milk chocolate chips
1 egg
1/2 teaspoon vanilla
1/4 cup milk
1/4 cup vegetable oil
1/4 cup + 2 tablespoons sour cream
1/2 cup hot fudge sauce*
chocolate sprinkles

Directions:
Preheat oven to 375 degrees and grease mini donut pan. Set aside.
In a large bowl, whisk together flour, sugar, cocoa powder, baking soda, and chocolate chips.
In a separate, smaller bowl, whisk the egg, vanilla, milk, vegetable oil, and sour cream until just combined. Using a spatula, stir the wet ingredients into dry ingredients until incorporated. Spoon or pipe (I found the piping method to be the easiest!) donut batter into prepared pan. Bake for 5-6 minutes or until tops spring back when touched. Let donuts cool completely.
Once donuts have cooled, warm up fudge sauce for 10 seconds or until of drizzling consistency. Dip the bottoms (dipping the bottoms gives you a nicer, rounder, donut top) of each donut in the fudge sauce and then sprinkle generously with chocolate sprinkles.

NOTE:
*Store-bought or homemade fudge sauce will work. I had a batch of this fudge sauce sitting in my fridge, so that’s what I used. The only change I made to the recipe was using 6 oz of semi-sweet chocolate instead of dark or bittersweet.


Mini Chocolate Fudge Donuts

Did you notice the fudge dipped, and chocolate sprinkle covered, milk glass? Tell me you noticed that. Best. Idea. Ever.

No-Bake Nutella Cheesecake with a Peanut Butter Cookie Crust

No-bake Nutella Cheesecake

Umm, guys, I can’t stop eating dreaming  wanting nutella. Well, nutella and peanut butter that is. I can’t have one without the other. I use to just eat spoonfuls of peanut butter, and be perfectly happy, but now my peanut-butter-smothered spoon demands to be dunked into nutella. I don’t know if you’ve ever dealt with peanut butter smothered spoons, but they can be quite persuasive when they want to be. Real sweet talkers. You just can’t say no to them.

It could also be that I don’t want to say no. Fine, I’ll admit it. I’m a peanutbutternutellaaholic.

And, as a pbnaholic, I accept a few things to be true. The first being that peanut butter and nutella are having their moment and I shouldn’t try to stop them. The second thing is that I accept that my spoon will now have to be dunked in both creamy substances before I can eat it. And, lastly, I accept the fact that both my jar of peanut butter and nutella are cross contaminated with each other. Surprise surprise, I can’t really find it in me to be bothered by this fact either. Really, it means less mixing for me, which means, more spoonfuls finding their way into my mouth.

Tell me how that sounds like a problem?

Exactly, my wonderful friends, it doesn’t.

No-bake Nutella Cheesecake

I know, I know, I’m fashionably late to the nutella party. My bad. I just wasn’t into it before. At all. I didn’t even want to try it. How ridiculous of me, right? But, then I finally bought a jar, had a tentative spoonful, decided it needed some peanut butter, and the rest is history. Well, maybe not, considering I can’t forget it.

Like I can’t forget these Peanut Butter & Nutella Pastry Puffs I made last week.

Like I won’t forget to buy a new nutella jar at target.

Like I’ll never forget about this cheesecake.

No-bake Nutella Cheesecake

This cheesecake. I. LITERALLY. CAN’T. EVEN.

Let me explain.

A homemade peanut butter cookie crust. I won’t even deny the fact that I made peanut butter cookies for the sole purpose of crumbling them up and using them as a crust. Or, that I made three different batches of varying sizes (large, small, and mini) just so that I would have the perfect sized peanut butter cookie as a topping for my cheesecake. What, you don’t think that’s normal? Awkward.

The peanut butter cookie crust is then topped with the most decadent and velvety no-bake nutella cheesecake in the world. Two words here people: rich and nutellaly—let’s pretend that’s a real word. Can I say one more word? Creamy. So, so, creamy. The ricotta cheese is to thank for that one. Yes, you heard right, ricotta cheese. Funny story, I had intended to add mascarpone cheese to this cheesecake, but accidentally grabbed ricotta instead. I got distracted by samples at Trader Joe’s. Can you blame me? It turned out to be a glorious mistake anyways. And, then of course, there’s whipped cream and the {perfect sized} mini peanut butter cookie on top.

No-bake Nutella Cheesecake

I repeat, I. CAN’T. EVEN.

No-bake Nutella Cheesecake with a Peanut Butter Cookie Crust
Yields: 4 large servings

Ingredients:
20 mini (or, about 9 larger) peanut butter cookie crumbs (I used this cookie recipe)
2 1/2 tablespoons unsalted butter, melted
2 (8 oz.) blocks of cream cheese, softened
1/2 cup powdered sugar, sifted
1 1/2 cups Nutella
4 to 5 tablespoons ricotta cheese (depending on texture and taste use more or less)
3/4 cup heavy cream
1-2 tablespoons sugar
1/2-1 teaspoon vanilla
whipped cream & mini peanut butter cookies, for garnish

Directions:
Combine melted butter and cookie crumbs, until just combined. Divide the crumb mixture equally between serving glasses, lightly pressing into the bottom of the glass. Set aside.
In the bowl of the stand mixer with whisk attachment whip heavy cream until stiff peaks form. Add sugar and vanilla, to taste, beating until just combined. Scrape into a separate bowl and set aside.
Using the same bowl you whipped the heavy cream in, beat the cream cheese until smooth. Mix in the powdered sugar, scraping the sides of the bowl as needed. Add nutella, mixing until incorporated, and then the ricotta cheese–add more or less depending on how velvety you want it. Using a spatula fold in the whipped cream mixture until just incorporate. Taste your cheesecake as you go and alter the taste for your preference, if you think its to rich add more whipped cream to lighten it up.
Spoon or pipe nutella cheesecake evenly into serving glasses, making sure to smooth the tops. Let chill for about two hours in the fridge.
Top cheesecakes with fresh whipped cream and a mini peanut butter cookie. Enjoy!


No-bake Nutella Cheesecake

Peanut Butter & Nutella Pastry Puffs

Peanut Butter & Nutella Pastry Puffs

Guys, I’m going to make this short and sweet.

Cause, really, there is only a few things I need to say. And, I’m pretty sure you have better, more romantic, things to do then listen to me on this Saturday. Don’t worry, I won’t hold that against you. How could I?

However, if you don’t have anything better to do then stay tuned, cause I have a very, VERY, important question to ask you. Seriously, it’s like one of the top 5 important questions in the world.

Pretty serious sounding, huh?

Peanut Butter & Nutella Pastry Puffs

Oh. Crap. I almost forgot.

Happy Valentine’s Day you beautiful little person, you.

I feel like today’s the perfect day to tell you how I feel about you. Basically, I adore you to the moon and back. Too corny? Oh well, I’m a hopeless romantic after all, so you’re just going to have to deal with it.

Acceptable? Good, I’m glad we agree. But, really, I love you guys. This blog would be so boring without you. Not to mention, I’d have way less friends if you weren’t around.

So, about that question, I was wondering if maybe you would want to sort of kind of be…

Peanut Butter & Nutella Pastry Puffs

WAIT.

I haven’t told you about the delicious love affair taking place in these pastry puffs.

And, it’s pretty delicious.

Peanut Butter meets Nutella who meets Pastry who meets White Chocolate, and the world was never the same.

Peanut Butter & Nutella Pastry Puffs

Did I mention they are easy to make? Cause they totally are.

Did I mention that I only want to eat peanut butter and nutella now? Cause I totally do.

Oh, and did I ask you to be my Valentine? Cause I totally love you.

Well, you and the pastry puffs. If you’re cool with that then we should hang out. If you’re not there may be something wrong with you. Just saying.

Peanut Butter And Nutella Pastry Puffs
Yields: 18 pastry puffs

Ingredients:
1 sheet puff pastry, thawed
1/4 to 1/3 cup creamy peanut butter
1/4 to 1/3 cup nutella
about 2 tablespoons water
granulated sugar & heavy cream (or half and half) for brushing the tops of the pastry
1/4 cup white chocolate chips, melted

Directions:
Thaw puff pastry according to instructions on the box–either let it sit in the fridge over night or at room temperature the day of for about two hours. Once thawed, preheat oven to 400 degrees and gently roll out puff pastry, extending it about an inch on each side, on a well floured surface.
Using a pizza cutter (or, sharp knife) cut the pastry dough in half (vertically or long wise). Stack the two halves on top of each other and cut into 18 squares–I did six strips, cut horizontally, and then cut each strip twice to make three squares total. Remove the top squares from the bottom squares and set aside.
Using 1/4 teaspoon (or, baby spoon) dollop a small amount of peanut butter into the center of each square. Once each square has peanut butter, dollop an equal amount of nutella into the center of each square. Gently swirl the two dollops together. Alternatively, you could mix the nutella and peanut butter together from the start and then dollop a heaping 1/2 teaspoon of the combined mixture into the center of each squares (if I made these again I’d use this method).
Using your finger dampen the edges of each square with a little bit of water, this helps with the sealing. Top each filled square with another pastry square and using your fingers gently seal the square on each side, it’ll look like a ravioli. Use a fork to crimp the edges of the pastry puffs, making sure each one is completely sealed. Brush each square with a little heavy cream and sprinkle with sugar.Bake for 8-10 minutes or until the tops are lightly browned.
Allow pastry puffs to cool slightly before drizzling with white chocolate. Best served immediately while filling is still warm.


Peanut Butter & Nutella Pastry Puffs