Lemon Oreo Creme Bars

Lemon Oreo Creme Bars I’ve told you how much I love Oreos and peanut butter. How I like to dip to smother said Oreo with as much creamy peanut butter as possible before stuffing it into my face. Not very lady like, I know.

That’s my comfort food. My pick me up. Oreos, peanut butter, and a large glass of milk. That’s what I eat when I need to feel happy. BUT, sometimes (very rarely) there isn’t a jar of peanut butter around. And I’m left with just regular Oreos and milk. And, guess what? That’s perfectly fine too.

The thing is, I like Oreos in general. With or without peanut butter. Double stufed or not. Flavored filling or regular. I’m an Oreo lover. Period. No ifs, ands, or buts about it.

I’m that girl who walks down the cookie aisle every time I go to the market just to see if a new flavor or a seasonal/holiday themed Oreo has come out. And, of course, if something new is out, I have to buy it. Just to try it or to see the different designs up close. I mean, come on, Nabisco went through alllllll that trouble to create this cookie and it would simply be rude not to purchase a pack.

I, for one, am not rude (or, I try never to be rude), which means I buy the Oreos. What can I say? My mom raised me right.
Lemon Oreo Creme Bars Double Stufed Oreos? Been there, done that. A few times.

Mini Oreos? How could I not purchase them? They’re so tiny and cute.

Chocolate, Peanut Butter, Golden Oreos? Yup. Tried those too. Birthday Cake, Gingerbread, Mint, Coconut, Candy Corn, Marshmallow Creme, Berry Burst? Yeahhh, basically if you can name it, I’ve most likely tried it. And, sure, I like some flavors better than others, but I try to give each new creation a fair shot. I try one cookie, and if I like it, I eat more. Sometimes I like it so much that I make an immediate market run to buy another pack—you never know when they’ll be off the shelves.

This brings us to Lemon Creme Oreos. I bought a pack, ate one cookie, and within two days, the pack was gone. And, no that wasn’t just me eating them. Come on people, who do you think I am? Some sort of Oreo Junkie? Pssh. Not me…

Lemon Oreo Creme BarsThe fact that I like these Lemon Creme Oreos is actually a little weird. Why? Well, lets just say I don’t really like lemony things. At all. As in, I’m not a fan of lemon bars or really anything with lemon, with the sole exception being lemonade. And, now these Oreos. And, these Lemon Oreo Creme Bars too.

I figured since I liked the Lemon Creme Oreos so much, I’d give the whole lemon bar situation another try. I wanted to make a lemon bar that basically tasted just like these Oreos: creamy, not too tart, but not too sweet, and not overwhelmingly lemony.

Lemon Oreo Creme Bars 
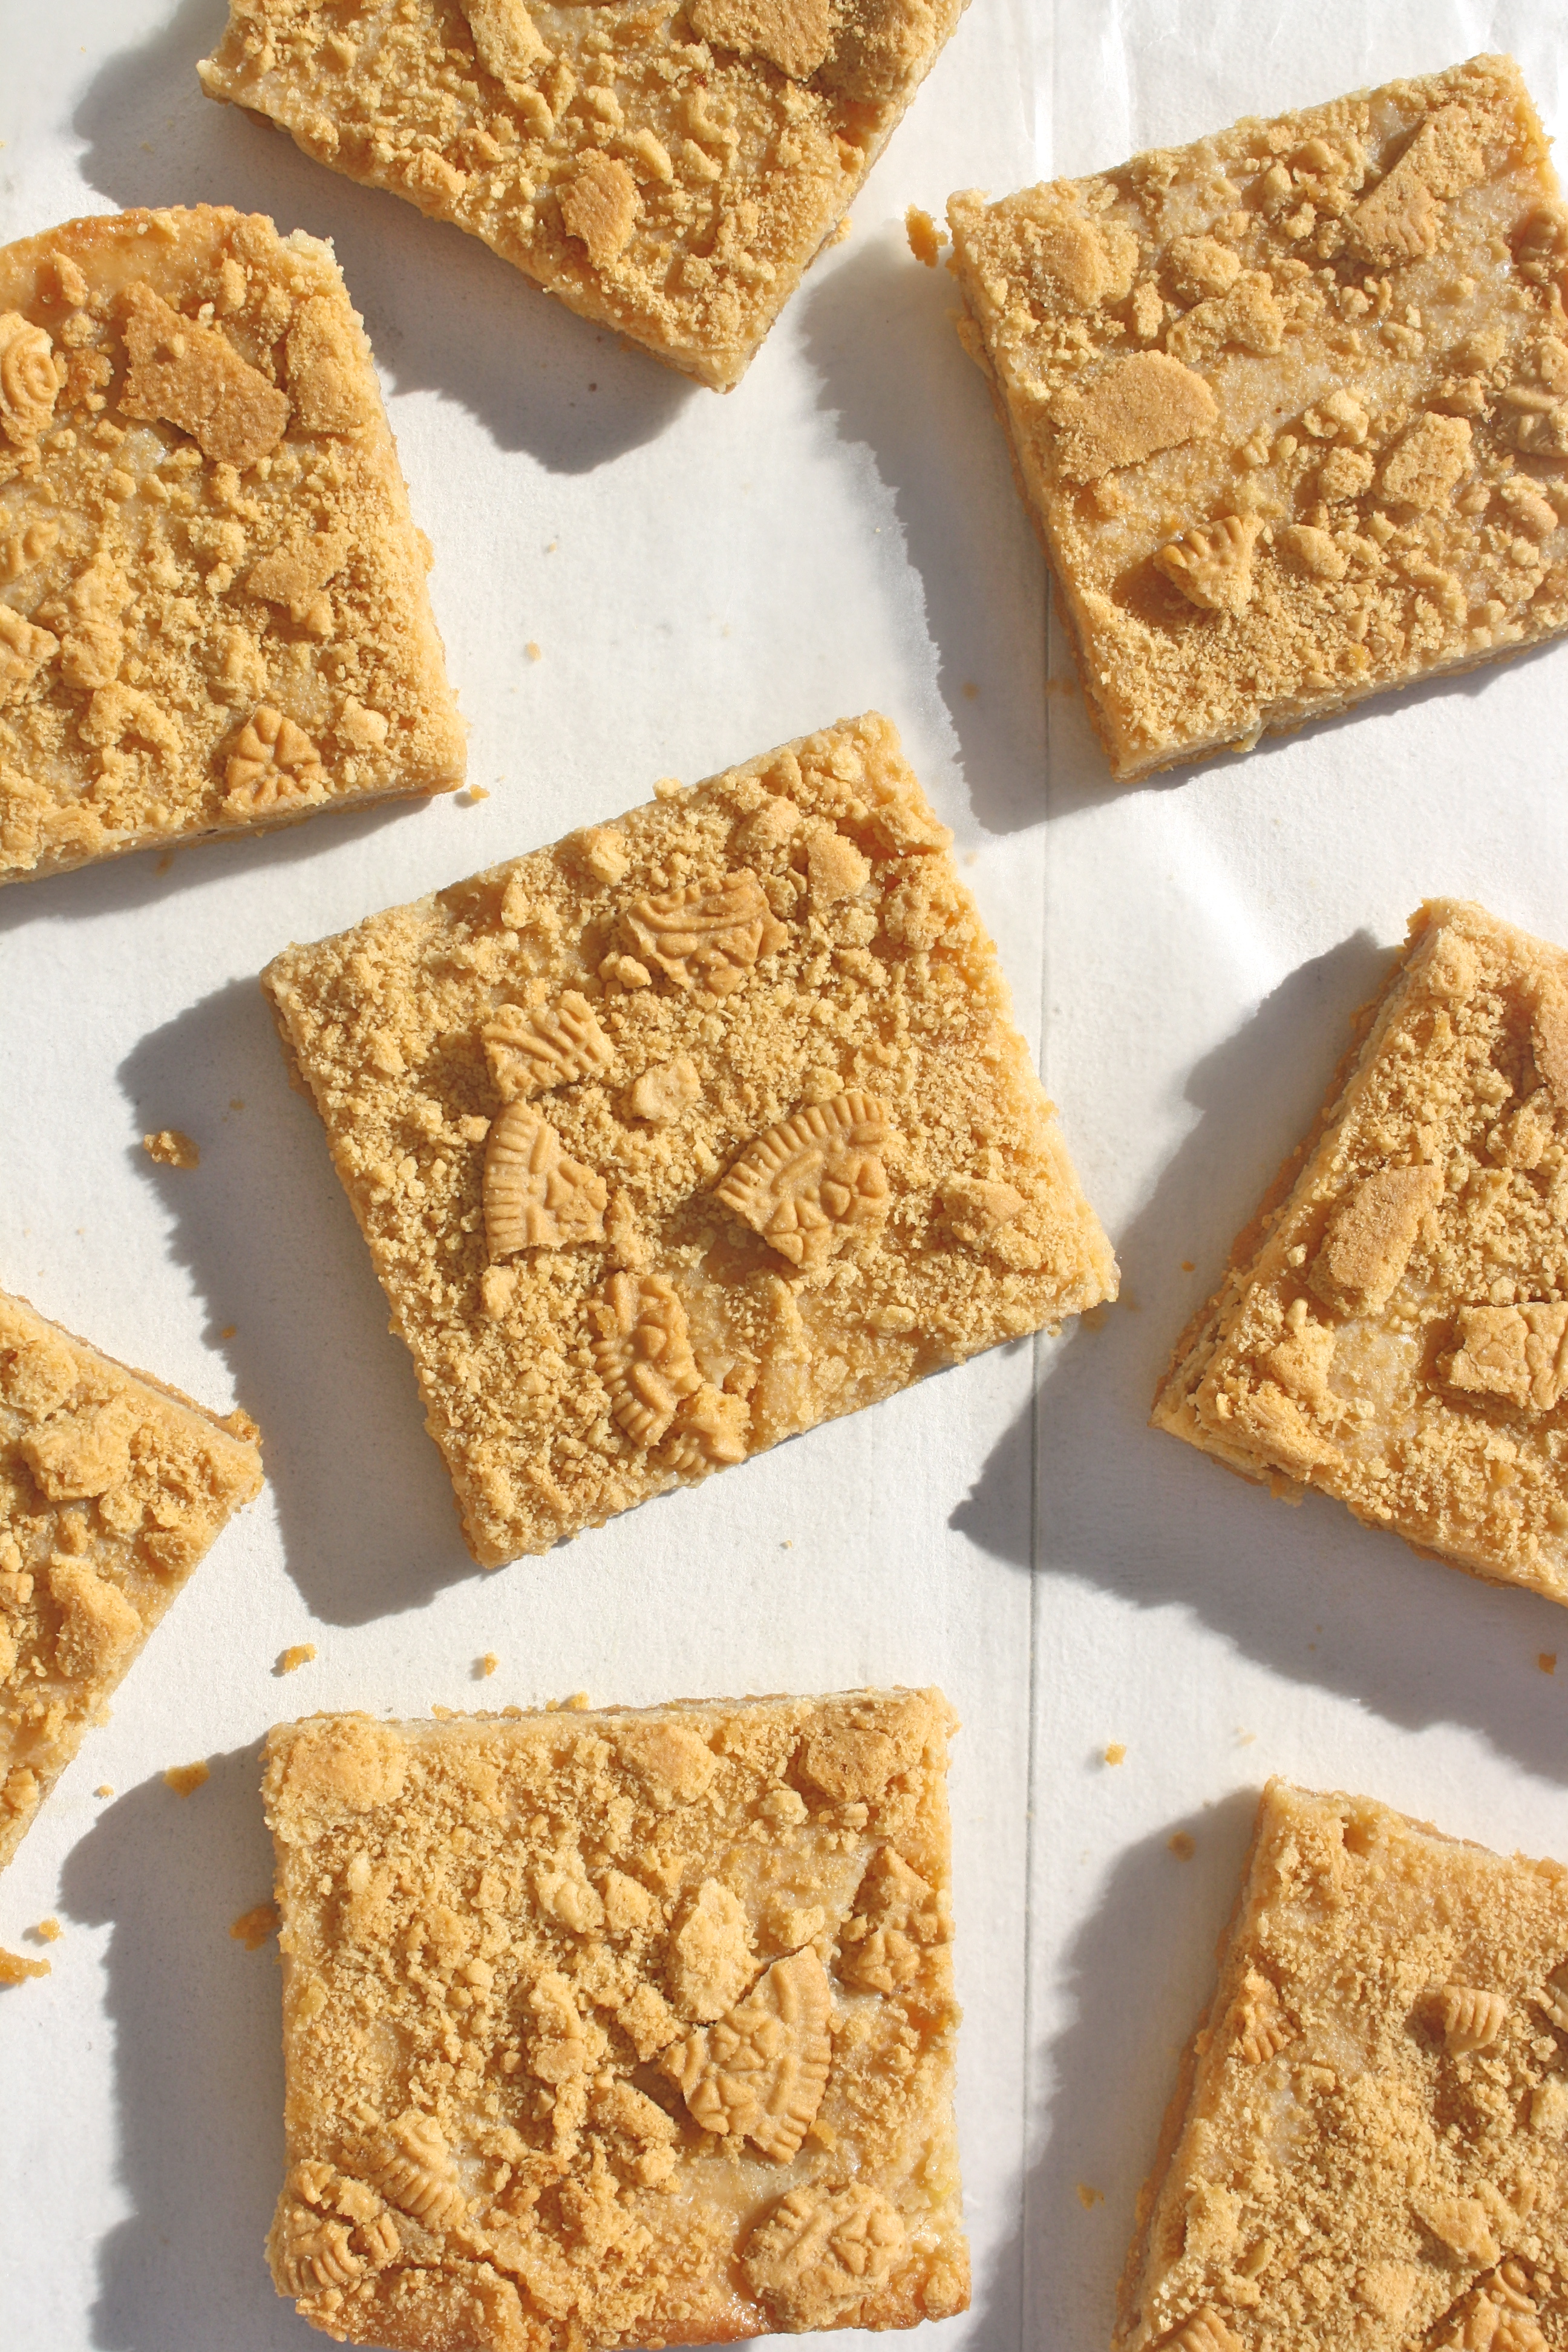
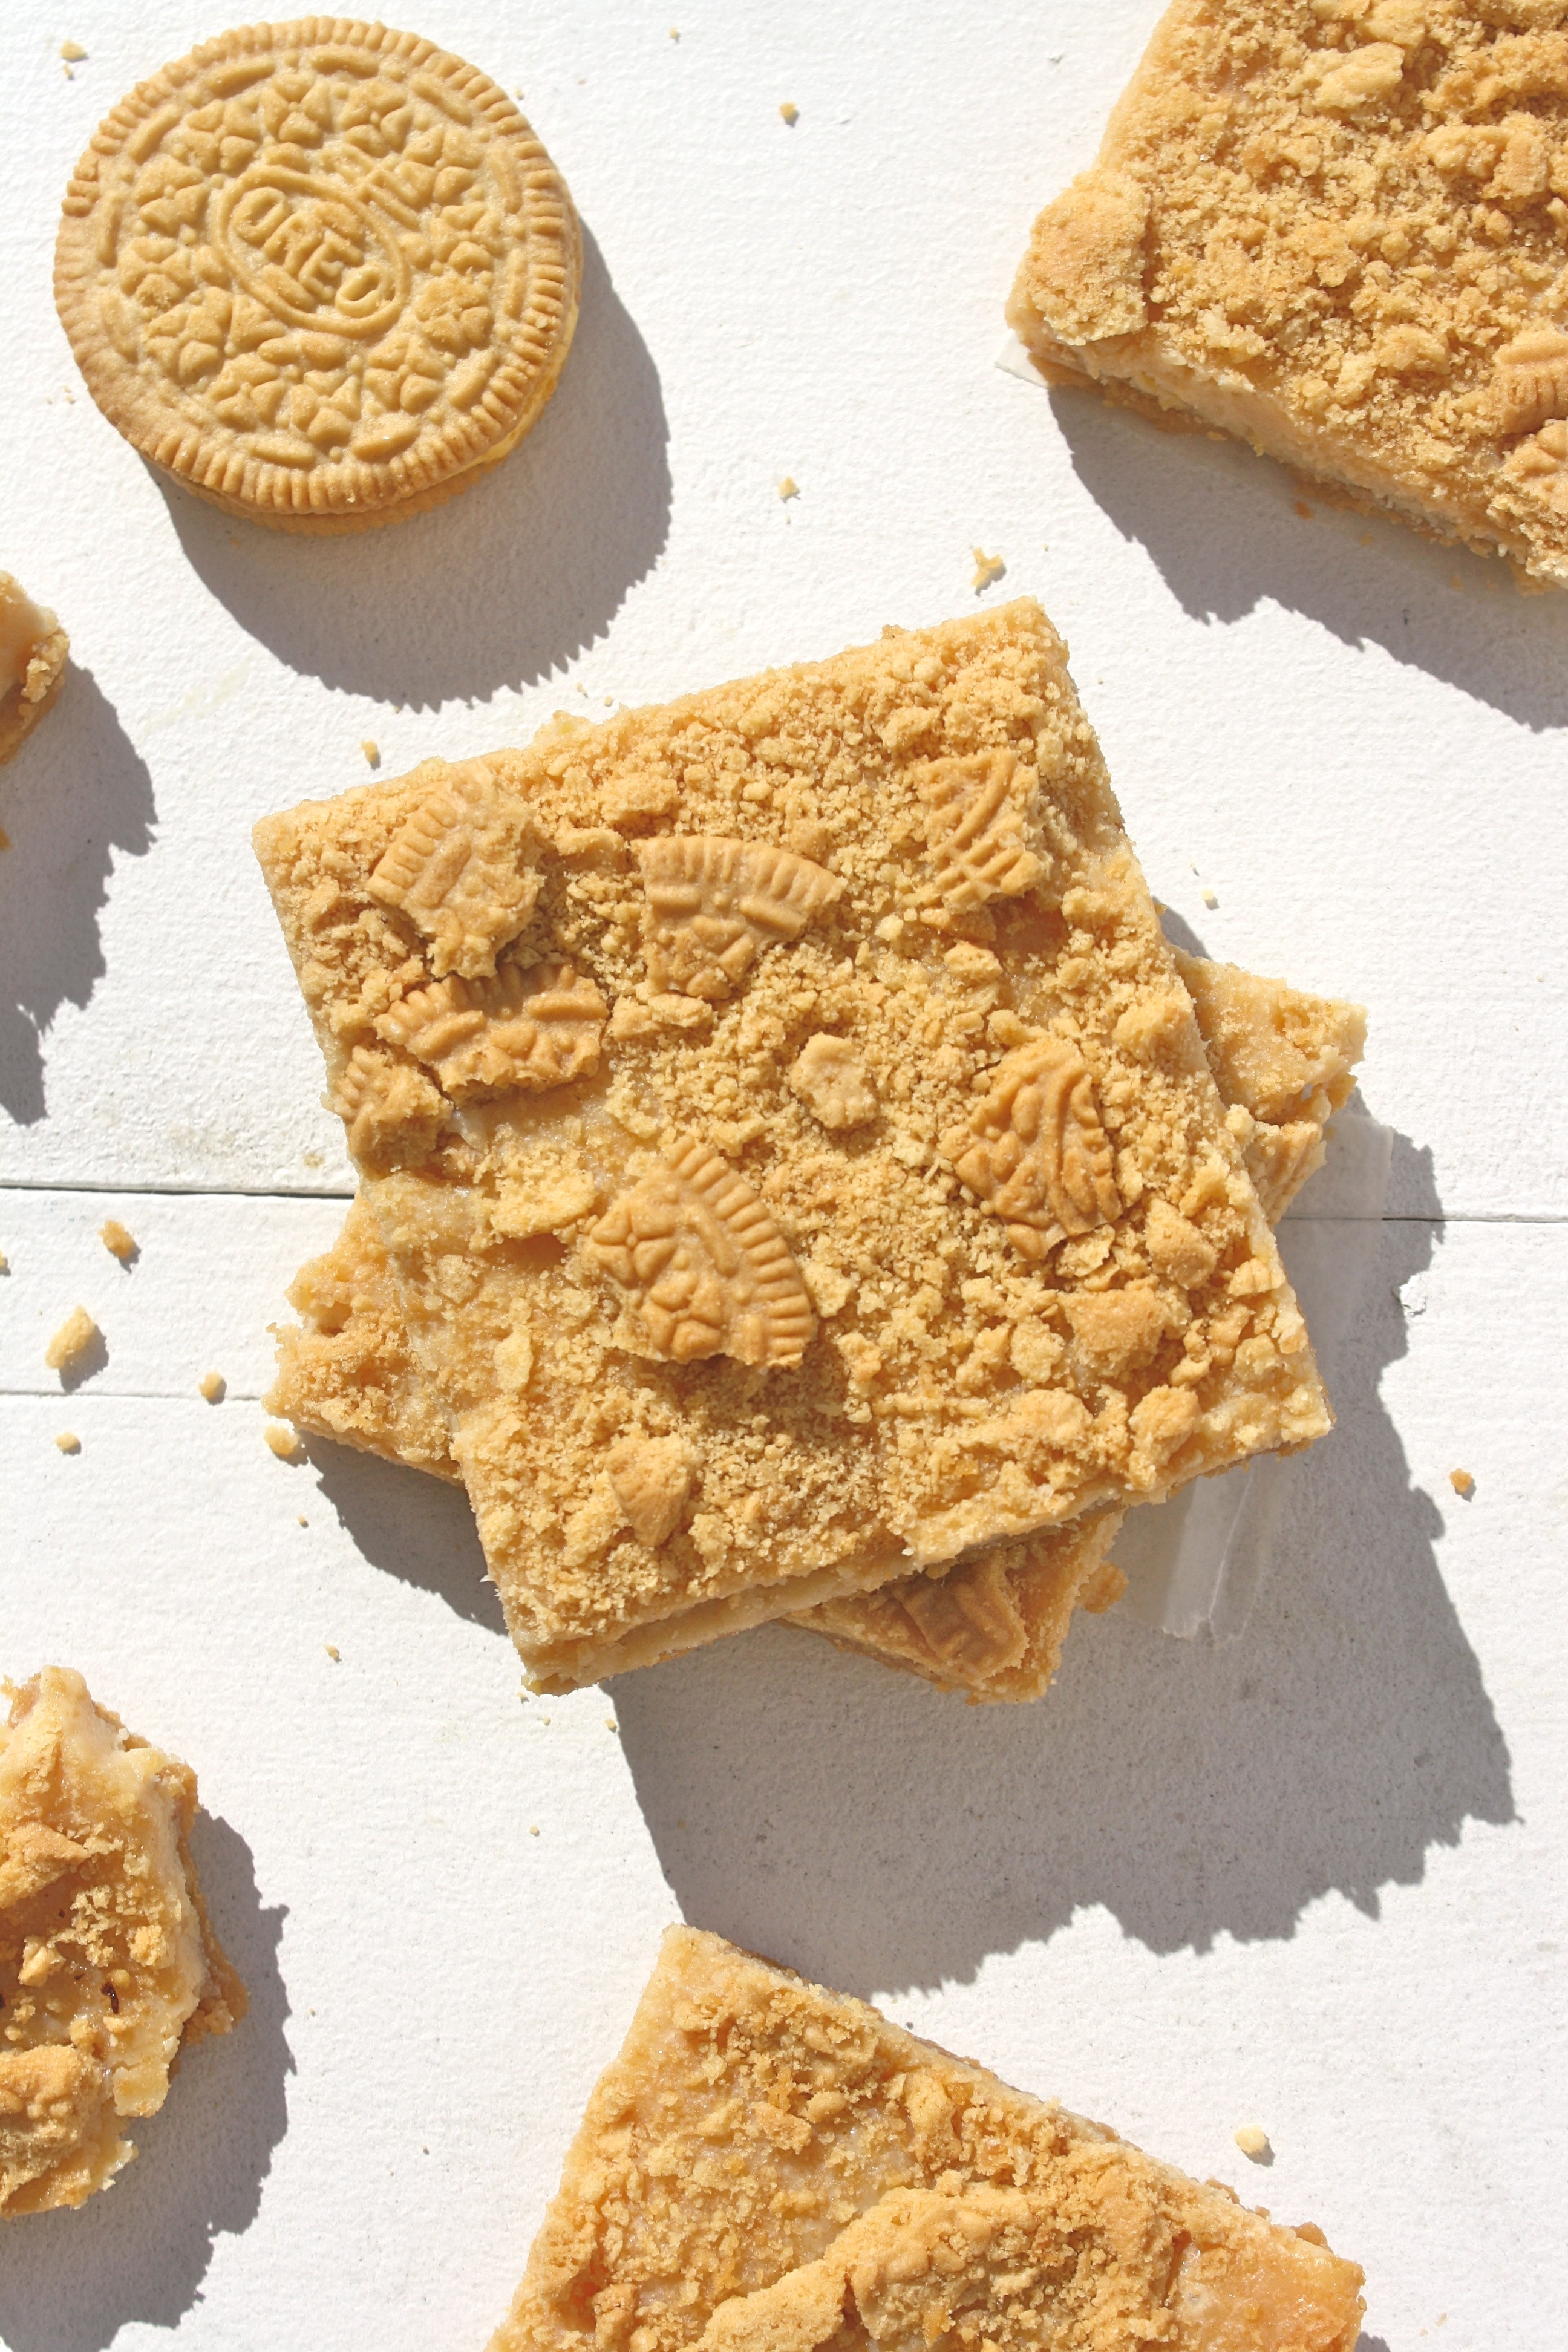
These Lemon Oreo Creme Bars have a lemon Oreo crust, are filled with a creamy lemon filling, and then sprinkled with crushed lemon Oreo cookies (minus the lemon filling). If all lemon bars tasted like this I would eat them on the regular. Seriously, these bars are perfect for lemon lovers and non-lemon lovers alike. They are creamy, lemony, but not in an overpowering way, and the perfect balance between sweet and tart. Did I mention super easy and quick to put together too?

Lemon Oreo Creme Bars
Yields: about 9 large bars

Ingredients:
Lemon Oreo Crust
20 Lemon Creme Oreos cookies
3 tablespoons unsalted butter, melted

Lemon Creme Filling
1 (14 oz.) can sweetened condensed milk
¼ lemon juice
2 ½ teaspoons grated lemon peel

Oreo Topping
7 Lemon Creme Oreos cookies, with the filling scooped out, crushed

Directions:
Preheat oven to 350 degrees and line an 8×8 or 9×9 pan with parchment paper. Set aside.
In a food processor pulse the whole Lemon Creme Oreos into a coarse crumb. Pour crumbs into a medium-sized bowl and stir in the melted butter. Press crust into the lined pan and bake for 9 to 10 minutes. Let sit on top of the stove as you prepare the filling.
In a medium-sized bowl combine sweetened condensed milk, lemon juice, and grated lemon peel. Pour over the warm crust—use a spatula to make sure it’s spread evenly.
Sprinkle the crushed Oreo Cookies (with the filling scooped out) evenly on top of the lemon creme filling. Bake for 24 to 26 minutes, or until the top is a light golden brown.
Let cool to room temperature and then place in the fridge for 30 minutes before cutting into squares.

*lemon creme filling adapted from Betty Crocker


Lemon Oreo Creme Bars

Caramel Toffee ‘Pot of Gold’ Cupcakes

Caramel Toffee Pot of Gold CupcakesSee what I did there?

It’s your lucky day. Call it the luck of the Irish, if you will. I’m giving you, and myself, a pot of gold.

POTS. OF. GOLD.

We’re practically rich at this point. Think of all the things we can buy. Unlimited amounts of Ben & Jerry’s. An Endless supply of Oreos. And, peanut butter. Oh, and obviously milk. Hopefully you don’t mind double dipping. Ohhh. Even better. A bigger kitchen. That way I can invite you over to bake with me. You can be my official taste taster. You in?

FINE. I see you shaking your head. You never let me have any fun.

I made us edible pots of gold.

We can’t spend them. BUT. We can eat them. All of them. And, you know what, that doesn’t sound too bad to me.

Caramel Toffee Pot of Gold CupcakesI came up with the idea for these pot of gold cupcakes in a dream. And no, I’m not kidding. Normal people daydream about vacations or winning the lottery or having that magical storybook romance. Not me. I daydream mainly about food. Not eating it so much, but making it. When I stare off into space I’m building recipes, imagining  different flavor combinations, and debating if those combinations would taste better as a cake, cookie, pie, or so on. Foodie dreams. That’s what I have. Don’t judge. It does happen to some people. I can’t be the only one. Right?

I wanted to make a cupcake that was St. Patrick’s themed, but I didn’t want it to be green or involve four-leaf clovers…there are way too many adorably indulgent desserts already with those two things. So, I started thinking. What else screams March 17th?

Bailey’s Irish Cream. Tad bit predictable. Jameson Irish Whiskey. I don’t even like whiskey. Leprechauns. Would be hard to make into a dessert. Hmm. What’s related to a leprechauns? Gold. I could make gold cookies. Wait. Pots of gold. BINGO. I found a winner—keep in mind that’s basically a direct quote of my inner monologue. Your welcome for sharing my craziness.

Once I had the idea of making pots of gold, the recipe just sort of fell into place. Hellllllllo caramel toffee cupcakes topped with a fluffy caramel marshmallow frosting, coated with caramel, and sprinkled generously with toffee pieces.

Caramel Toffee Pot of Gold CupcakesLet’s break this down more slowly.

Caramel toffee cupcakes. They are ridiculously moist, soft, and caramely. Toffee pieces are scattered throughout the cupcake, making the caramel flavoring even richer. Each cupcake is then topped with Caramel Marshmallow Frosting. This frosting tastes like a combination of cool whip and marshmallows subtly infused with hints of caramel. Yes, that is a thing. And yes, it’s to die for. Once topped with the fluffy frosting, the cupcake is dipped in a caramel bath (can we make that a thing?) and then sprinkled generously with toffee pieces aka pieces of gold. Together, as whole, this cupcake is heavenly.

Caramel Toffee Pot of Gold CupcakesOne thing though…if you notice, I have some chocolate pieces on top of each cupcake too. That’s because I mistakenly grabbed a bag of milk chocolate toffee pieces and not just plain toffee pieces. I noticed this as I was melting my caramel, which meant I was going to be making pots of gold filled with sparkly, and dull, gold pieces. Don’t make my mistake if you want pure pots of gold. Or, do make my mistake. The hints of chocolate are a nice surprise for the taste buds amidst all that caramel and toffee.
Caramel Toffee Pot of Gold Cupcakes

Caramel Toffee Pot of Gold Cupcakes
Yields: about 13 cupcakes

Ingredients:
Caramel Toffee Cupcakes
1 ½ cups all-purpose flour
¾ teaspoon baking powder
½ teaspoon salt
½ cup (1 stick) unsalted butter, softened
¾ cup dark brown sugar
¼ cup golden brown sugar
½ cup sugar
2 eggs, at room temperature
1 teaspoon vanilla
½ cup milk (don’t use skim or 1%)
½ cup toffee bits

Caramel Marshmallow Frosting
1 ½ cup sugar
3 egg whites
¼ teaspoon cream of tartar
¼ cup water
½ teaspoon vanilla
1/8 to ¼ teaspoon caramel extract (add more depending on your taste)

Caramel Coating & Gold Pieces
11 oz bag of vanilla caramel squares for melting (I had about 6 leftover squares)
2/3 cup toffee bits

Directions:
Caramel Toffee Cupcakes
Preheat oven to 350 degrees and line a muffin pan with cupcake liners. Set aside.
In a small bowl whisk together flour, baking powder, and salt until combined. Set aside.
In the bowl of a stand mixer with a paddle attachment, beat butter and both sugars together at medium-high speed until fluffy, about 2 ½ minutes.
Mix in eggs, one at a time, and vanilla, until incorporated.
Slowly add the dry ingredients to the wet ingredients, scraping down the sides as needed.
Slowly stir in the milk, until just combined.
Using a spatula, fold in the toffee bits.
Fill each cupcake liner about 2/3 full, dividing the batter evenly between the cupcakes. Bake for about 23-25 minutes or until a toothpick inserted in the center comes out clean.
Transfer cupcakes to a wire rack for cooling. Let cool completely before frosting, at least an hour.

Caramel Marshmallow Frosting
Before you start making the frosting, clear a space in your freezer to put the frosted cupcakes.
Set a pan of water over medium heat and bring to just barely a simmer.
In a heatproof bowl, beat together sugar, egg whites, water, and cream of tartar, using a handheld electric mixer on high until foamy.
Set bowl over pan of simmering water, making sure the bottom of the bowl doesn’t touch the water, and beat mixture on high until frosting forms stiff peaks, about 15-20 minutes (yes, it’s an arm workout); candy thermometer should read 160 degrees.
Remove from heat and beat in vanilla and caramel, about two minutes or until frosting is of a thick enough consistency.
Using an ice cream scooper, scoop a ball of frosting on the top of each cupcake in the middle.
Let cupcakes sit in the freezer for about 30 minutes or until frosting has set enough that you can flip the cupcakes upside down without the frosting falling off.

Caramel Coating & Gold Pieces
While the frosting is setting melt caramel squares as directed on the package in a tall cup or deep bowl. Let melted caramel cool to room temperature—you want it to be cooled, but of drizzling consistency.
Holding a frosted cupcake upside down, dip the cupcake into the melted caramel—allow excess caramel to drip off.
Let caramel coated cupcake sit for a minute or so and then sprinkle with toffee bits—I found that if I sprinkled the cupcakes right away, some of the toffee pieces made the caramel drip off.
Place cupcakes in the freezer for about 15 minutes, or until the caramel coating has slightly hardened.

*cupcake recipe adapted from Sally’s Baking Addiction

This cupcake wanted to take a picture with these gold coins. In a mason jar. With a gold bow. Such a cupcake diva.

Caramel Toffee Pot of Gold Cupcakes

Toasted Coconut Donut Holes with Coconut Cream Filling

Toasted Coconut Donut Holes with Coconut Cream FillingGUYS.

I made donuts.

The mini kind. The kind you can eat in two bites.

The deep-fried, not baked, kind.

The leave your fingers chocolately, tummy happy, kind. The can’t stop popping them in your mouth kind.

I’m getting ahead of myself here. Let’s back this up.

Donuts.
Who doesn’t love donuts? No one. That’s who.

Toasted Coconut Donut Holes with Coconut Cream FillingI mean, come on, if you didn’t have to worry about weight, sugar intake, and all that other health related business wouldn’t you just eat donuts on the regular? I’m pretty sure I would. It would be my morning staple. Sometimes even my snack. I would definitely have a ‘usual’ at the donut shop, and never have to wait in line. Sounds pretty awesome, right?  In my perfect world that would happen. But, in the real world, I can’t even tell you the last time I had a donut. And, I’m talking a real donut here. Not the baked kind. Not like the Baked Cinnamon Brown Sugar Donut Bites I made a while ago.

It may actually have been a year ago that I ate a real donut. Maybe even longer.  It’s not like I’m purposely avoiding donut shops either. It’s just…I’m not a huge breakfast person. And by that I mean I drink a cup of coffee, sometimes two, and call it a day. And, my snacks typically consist of goldfish or pita chips with a little hummus. As you can see, that doesn’t leave a lot of room for donut eating.

The idea of making my own fried donuts never really was a thought. I mean, there are a million other decadent desserts I want to make, and I don’t even have a deep fryer. Yes, I could just use oil and a huge pot, but I never had a good enough reason to go through all that trouble. Plus, I’ll admit it, I was slightly nervous about getting oil burns. I hear they hurt. A lot.

Are you wondering why I decided to finally make fried donuts? No. Okay, well, I’m still going to tell you anyways. My good friend, Lauren, visited this past week. Unlike myself, Lauren has no fears of oil burns. She is a lover of donuts, is always willing to have adventures in the kitchen, and can handle my craziness during the baking process rather well.

Let the fried donut making ensue.

Toasted Coconut Donut Holes with Coconut Cream FillingAs a first timer making donuts, I just want to start by saying, it’s actually kind of fun. Sure, it’s a process—making the dough, refrigerating the dough, letting the cut donuts rise, frying, cooling, stuffing with coconut cream, dipping in chocolate, and sprinkling with toasted coconut—but, the end result is totallllyyyy worth it. And, when you have a partner in crime in the kitchen with you, the time literally flies by.

The dough for these donuts was super easy to work with, and fried up rather nicely (and pretty quickly) into little golden donut holes. Neither Lauren nor I was burned by the oil, but we did burn the roofs of our mouths trying to taste test the donuts before they had cooled. Yup, we both are that inpatient. One of the reasons we’re friends. The donuts themselves are light, fluffy, and not overly sweet. Each donut hole is filled with coconut cream pudding, dipped in chocolate, and then sprinkled with toasted coconut shreds. If you like donuts, and you like coconut, you’ll want to make these!

Toasted Coconut Donut Holes with Coconut Cream Filling
Yields: about 40 donut holes

Ingredients:
Donut Holes
1 package (2 ½ teaspoons) active dry yeast
2/3 cups milk, at room temperature
1/3 cup sugar
2 teaspoons salt
3 ½ cups all-purpose flour
3 eggs
7 tablespoons unsalted butter, at room temperature, cut into 7 tablespoons
Canola oil, for frying

Coconut Cream Filling
1 (3.4 oz.) package of Jell-O instant Coconut Cream Pudding
2 cups milk

Toppings
¾ cup semi-sweet chocolate chips
vegetable shortening, as needed
¾ cup sweetened coconut shreds, toasted

Directions:
Donut Holes
In the bowl of stand mixer fitted with a dough hook, combine yeast and milk. Allow yeast to dissolve completely, about a minute.
Mix in sugar, salt, flour, and eggs on low for about 4 minutes to develop the dough.
With the mixer still on low, add the butter, one tablespoon at a time, until incorporated, about 5 to 6 minutes.
Remove dough from bowl—it will be sticky, so do your best—and wrap tightly in plastic wrap. Let dough sit in fridge for 6-15 hours (I let mine sit overnight and then made the donuts in the morning).
Once chilled, remove dough from plastic wrap and place on a piece of large parchment paper. Cover the top of the dough with another piece of large parchment paper and roll dough until about ½-inch thick. Using a 2-inch circle cookie cutter, cut out the donuts and place on a prepared (lined with parchment paper) cookie sheet. Allow donuts to rise in a warm spot for 1 ½-2 hours or until puffy and doubled in size.
When ready to fry, heat a pot filled with 3 inches of oil to 350 degrees. Line a baking sheet with papers towels (to soak up the extra oil) and set aside. Add donut holes to oil—be careful not to overcrowd the pot—and fry each side of the donut for about 1 ½ to 2 minutes, until golden brown. Make sure to watch your temperature as you continue to fry each batch of donut holes.
Remove donuts with slotted spoon and transfer to the paper-towel lined baking sheet. When cool enough to handle, transfer donut holes to a tray to cool completely.

Coconut Cream Filling
In a medium-sized bowl, mix together coconut cream mix and milk until combined. Let sit in the fridge for about 5 minutes.
Fill a pastry bag with a medium sized tip with coconut cream pudding. Poke a hole on each side of the donut (equidistant between the top and bottom of the donut) and squirt about 1/8 cup in each side of the donut.

Toppings
In a microwave safe bowl, melt semi-sweet chocolate chips and a little vegetable shortening, until of drizzling consistency (microwave in 15 second intervals, stirring after each interval, until smooth).
Dip the tops of each donut hole into the chocolate, holding the donut upside down to let excess chocolate drip off. Sprinkle the top of the chocolate-coated donut with toasted coconut shreds.

*donut recipe adapted from Buns In My Oven


Toasted Coconut Donut Holes with Coconut Cream Filling

Death By Peanut Butter Chocolate Cupcakes

Death By Peanut Butter Chocolate CupcakesAttention peanut butter lovers.

Attention Reese’s lovers.

Attention cupcake lovers of the world.

Oh, and attention those who wish to die from stuffing their face with the most ridiculously peanut butter packed chocolate cupcake in the universe.

Notice I said the universe. Not just the world. That’s how badass these cupcakes are.

If you think about it, it’s really not a bad way to go, is it? Death by peanut butter chocolate food coma. I’m in. I mean, it could always be worse, like death by jelly filled donuts. Ick. Don’t get me started on that.

Or, death by chocolate covered raisin poison. Blech. Raisins on their own are the worst, but then to cover them in chocolate is just plain cruel. Why? Because certain people, I’m not going to mention names or anything, could mistake a heavily coated chocolate raisin for a delicious chocolate covered almond, and then, accidentally choke when they realize their mistake.

I now eat chocolate coated things with hesitation.

Oooh or, possibly even worse, death by frosting overdose. Yeah, so here’s the thing, I’m not entirely a fan of frosting. I eat it, mainly because there never seems to be a way to scoop it off without it getting awkward, but to be completely honest, I could live with out it. I really could.

Anyways, lets get back to happy things. Like these cupcakes.

Death By Peanut Butter Chocolate CupcakeThis week I wanted to make something that wasn’t so time consuming or detail oriented. I’ve spent the last two weeks making things like Seahawk Sugar Cookies—which required a ton of time and attention to detail—and Toasted Coconut XOXO Shortbread Cookies—which also took up some time because of the X’s and O’s. So, I decided easy, but equally tasty, was the name of the game this week.

One thing kept popping up in my mind. Box cake mix. I mean think about it. It’s super easy, relatively tasty, and I’m pretty sure at some point, we have all thrown a box cake mix together. We know box cake mix. We understand that by mixing four things together we can have quality cupcakes in less than 30 minutes. And, that’s a good thing. It’s a very good thing. But, I couldn’t just make a box cake mix and call it a day. That wasn’t going to cut it. Not for the blog. Not for me. And, certainly not for your sweet tooth.

What was a girl to do?

Enter peanut butter chocolate cupcakes that come from, drum roll please, a fancied up box mix. Gasp.

Death By Peanut Butter Chocolate CupcakeHow could I? But, really, how could I not? These cupcakes are for the days when you want a top-notch cupcake, but you don’t want to spend a ton of time making them. They are for the lazy days, the days that seem to go on forever, the days that you want something simple, and the days that you need a dessert induced food coma.

Let me tell you about these cupcakes.

These cupcakes require one bowl and you don’t even need a stand mixer—realistically, you could simply mix it with a spoon if you wanted to. I will warn you, however, that the batter gets really thick, so if you choose the spoon route, prepare to work those muscles. Also, if you aren’t weird about eating batter, please do yourself, and me, the favor of eating some. It tastes amazingggg. I dare you not to lick the bowl, spatula, and spoon clean. The baked cupcakes come out super moist, almost airy and fluffy, and have that Devil’s food cake taste with a subtly peanut butter undertone.

Feel free to eat the cupcakes without the ganache or topping if you don’t want to be in the kitchen anymore. I completely understand. But, if you are willing to wait a few more minutes for complete heaven, make the ganache, which tastes like melted peanut butter, and cut up the peanut butter chips, semi-sweet chocolate chips, and Reese’s Peanut Butter Cups. Together, as a whole, the cupcake packs a mean peanut butter flavor that will knock your socks off. Seriously, sit down while you eat these bad boys. But, before you do, pour yourself a large glass of cold milk, grab a napkin, and take two cupcakes. Trust me, one will not be enough.

But, then again, when is one serving ever enough?

Death By Peanut Butter Chocolate Cupcakes
Yields: about 23 cupcakes

Ingredients:
Peanut Butter Chocolate Cupcakes
1 (16.5 oz.) box Devil’s Food Cake (I used Duncan Hines)
1 (3.9 oz.) box chocolate instant pudding mix
4 eggs
1 cup milk
1/3 cup unsalted butter, melted and slightly cooled
1/4 cup creamy peanut butter

Peanut Butter Ganache
1 cup peanut butter chips
3/4 cup heavy cream

Toppings
1/2 cup peanut butter chips, roughly chopped
1/2 cup semi-sweet chocolate chips, roughly chopped
1 (12 oz.) bag miniature Reese’s Peanut Butter Cups, cut into cubes

Directions:
Peanut Butter Chocolate Cupcakes
Preheat oven to 350 degrees and line cupcake tin with liners. Set aside.
Using a stand or hand held electric mixer beat together cake mix, pudding mix, eggs, milk, butter, and peanut butter until well combined (about 2-3 minutes).
Scoop batter into the cupcake liners, about 3 tablespoons for each cupcake.
Bake for 18-19 minutes or until a toothpick comes out mostly clean when inserted into the middle of the cupcake.
Let cupcakes cool completely on a cooling rack.

Peanut Butter Ganache
Once the cupcakes are cooled, begin making the ganache. In a small saucepan combine peanut butter chips and heavy cream over medium heat, stirring frequently until smooth. Once the mixture is smooth and of drizzling consistency, remove from heat and let it cool to room temperature (about 10 minutes).

Assembling Cupcakes
In a medium bowl mix together chopped peanut butter chips, chopped chocolate chips, and cubed Reese’s.
Grab a cupcake and dip the top into the peanut butter ganache–make sure to hold it upside down for a bit to allow extra ganache to drip off. Sprinkle the top of the cupcake with the Reese’s and chip mixture.
Repeat the above steps until all the cupcakes have ganache and topping.
Place in the fridge for 7-8 minutes or until ganache has firmed up. Drizzle each cupcake evenly with the left over peanut butter ganache. Place back in the fridge for 5 or so minutes until the drizzle firms up.


Death By Peanut Butter Chocolate Cupcake

Toasted Coconut XOXO Shortbread Cookies

Toasted Coconut XOXO Shortbread CookiesWhen I think XOXO, the first thought that immediately follows is Gossip Girl. Yup, you got me, I used to watch the show. My second thought is the more traditional, hugs and kisses. Probably what your first instinct was, huh?

Well, did you know that thinking hugs and kisses isn’t technically right? Apparently, the X is supposed to stand for kisses and the O is supposed to stand for hugs. So, really, we should be saying kisses and hugs. Can I tell you how I know this? I spent a good twenty minutes researching the meaning of XOXO. I had never really thought about why it represented hugs and kisses—yes, I will continue to say it this way, because I think it sounds better…feel free to join me—until I started making these cookies. And, once I thought about it, I really wanted to know the answer. So, here we go. Your very own lesson on the History of XOXO—now you can’t say I never gave you anything for Valentine’s Day.

Back in the Middle Ages, many people couldn’t read or write, and when they were presented with a document requiring a signature of understanding, they would simply write the letter X on the signature line. The X was meant to represent the cross and convey that in Christ’s name the contents of the document were true. But, wait, that has nothing to do with kisses! You’re right, it doesn’t. The kissing part of the story has been debated, but the common theory is that many individuals after signing the X would then kiss the X as a symbol of truly believing in what the document stood for. Sounds legitimate, right? Some people don’t think so. They choose to believe that the X simply looks like two triangle-faced individuals locking lips. Hence, X meaning kisses.

The O, on the other hand, has a history that is still very much debated. Some will argue that it was created by Jewish immigrants, who wanted their own way of signing documents that wasn’t related to the Christian X. Others say that the game of tic-tac-toe provided the inspiration for using the letter O when people decided they wanted another letter to represent a different kind of affection. Or, it could just be that an O looks like two open arms hugging.

What do you think?

Toasted Coconut XOXO Shortbread CookiesAnyways, let’s talk about chocolate X’s and O’s covered in toasted coconut shreds on top of a buttery, coconuty shortbread cookie. Excuse me, as I go eat one right now.

The base of these little loveable bad boys is shortbread. A really reallyyy good shortbread. Before decorating them with X’s and O’s, my Dad taste tested a cookie and asked me if I had really made them. When I said yes—worried, mind you, that I somehow messed up the recipe—he said that they tasted like something you would buy at a bakery. Let me just tell you something about my Dad. He’s not a sugar-coater, if he likes something he’ll tell you, and if he doesn’t, you’ll know too. So, as you can tell, his compliment meant a lot to me. I found the recipe for this shortbread in a little wooden recipe box that used to be my Grandma’s. I don’t know where she got it or if it came from a recipe book, but what I do know is that I will never use another shortbread recipe again. And, since I like you so much, I’m gonna share it!

I wanted a little something more than just shortbread for Valentine’s Day, so I decided to spruce the dough up with coconut. Can I just say, it was the BEST decision ever. The shortbread cookie itself has that buttery, soft, melt in your mouth taste. The addition of coconut from both the extract, which isn’t overpowering, and the toasted coconut shreds, which adds a little crunch to each bite, leaves you with a subtly infused coconut cookie that isn’t overly sweet. I didn’t stop there though. The cookie is then decorated with semi-sweet chocolate and covered with more toasted coconut shreds in the form of X’s and O’s. Again, BEST decision ever.

Toasted Coconut XOXO Shortbread CookiesBelieve me when I say that you can’t go wrong with these cookies. Seriously. Make them for your Valentine, a friend, your family, or for that special someone who doesn’t know that you like them yet. These cookies should definitely win that person over. Oh, and Happy [Early] Valentine’s Day. May it be filled with lots of X’s and O’s.

Toasted Coconut XOXO Shortbread Cookies
Yields: about 30 cookies

Utensils:
Scalloped circle cookie cutter
X cookie cutter
O cookie cutter
Piping bag (or, Ziploc bag) & small tip
Toothpick(s)

Ingredients:
Toasted Coconut Shortbread Cookies
1 heaping cup sweetened shredded coconut, toasted
1 cup (2 sticks) unsalted butter, at room temperature
2/3 cup powdered sugar
½ cup cornstarch
1/8 teaspoon salt
½ teaspoon coconut extract
1 ½ cups all-purpose flour

Toasted Coconut & Chocolate Topping
¼ cup sweetened shredded coconut, lightly toasted
½ cup semi-sweet chocolate chips
Vegetable shortening, as needed

Directions:
Toasted Coconut Shortbread Cookies
Using a food processor (or, blender), pulse the toasted shredded coconut until coarsely ground. Set aside.
In the bowl of a stand mixer with paddle attachment, cream butter until light and fluffy.
Beat in powdered sugar until creamy. Scrape down the sides of the bowl as needed.
Add salt, cornstarch, and coconut extract. Mix until incorporated.
Gradually beat in the flour until combined, and then mix in the toasted coconut.
Gather the dough as best you can into a ball and place on a piece of parchment paper. Cover the top of the dough with another piece of parchment paper and roll to ½ inch thick. Slide the parchment-covered dough onto a cutting board and place in the fridge. Let chill for about 30 minutes.
After the dough is finished chilling, preheat oven to 350 degrees. Using the scalloped cookie cutter cut cookies—if the dough becomes too sticky or tough to work with place back in the fridge until it’s easier to handle.
Bake for 6 minutes, reverse tray (this will ensure an even color on the cookies!), and bake for another 5 more minutes or until lightly brown.
Let cookies cool for about a minute on the cookie sheet, and then transfer to a cooling rack to finish cooling.

Toasted Coconut & Chocolate Topping
While the cookies are cooling, coarsely ground (with a food processor or blender) the lightly toasted shredded coconut. Set aside.
Once the cookies have cooled completely, melt semi-sweet chocolate chips and a little vegetable shortening in a microwave safe bowl (microwave in 15 second intervals, stirring after each interval, until smooth).
Lightly press the X or O cookie cutter into the bowl of melted chocolate—make sure the cookie cutter has enough chocolate on the rim so that the outline will show up on the cookies. Use a toothpick to add or take away chocolate as needed. Gently press the X or O chocolate covered cookie cutter into the middle of the cookie and then lift up, there should be an outline of the letter—if the outline is incomplete, dip a toothpick in the melted chocolate and complete the outline by hand.
Working quickly, use either a piping bag or toothpick to fill in the letter completely with melted chocolate (I found the toothpick method to be easiest…just pretend the toothpick is like a painting brush)—if the chocolate begins to harden, place back in the microwave for another 15 seconds or until of drizzling consistency.
Once the letter is filled in with chocolate, sprinkle the toasted coconut over the letter. Dust off the extra coconut. If needed use a toothpick to add more coconut to a specific spot or to help keep the shape of the letter intact.
Using a piping bag with a small tip (or Ziploc), trace the scalloped edge of the cookie with chocolate. Re-melt the chocolate as needed.
Repeat the above steps, alternating between the X and O cookie cutter, until all the cookies are finished.


IMG_0265

XOXO,
Meggan