Caramel Toffee Chocolate Dipped Cookies

Caramel Toffee Chocolate Dipped Cookies
That’s a pretty flavorful title, huh?

Caramel.

Toffee.

And chocolate.

All packed into a single soft and chewy cookie. Please excuse me as I wipe the drool off my keyboard. Oh, would you like a napkin too? Here, borrow mine.

Would you believe that this tasty title wasn’t actually my first choice? It’s true, it totally wasn’t. The original title was much too long, and if we are being completely honest, there wouldn’t have been a napkin big enough to clean up the drool spill that would have ensued.

I see that look in your eyes. You want to know the title don’t you? Luckily for you, I’m in the business of giving the people what they want. So, here goes. Don’t say I didn’t warn you.

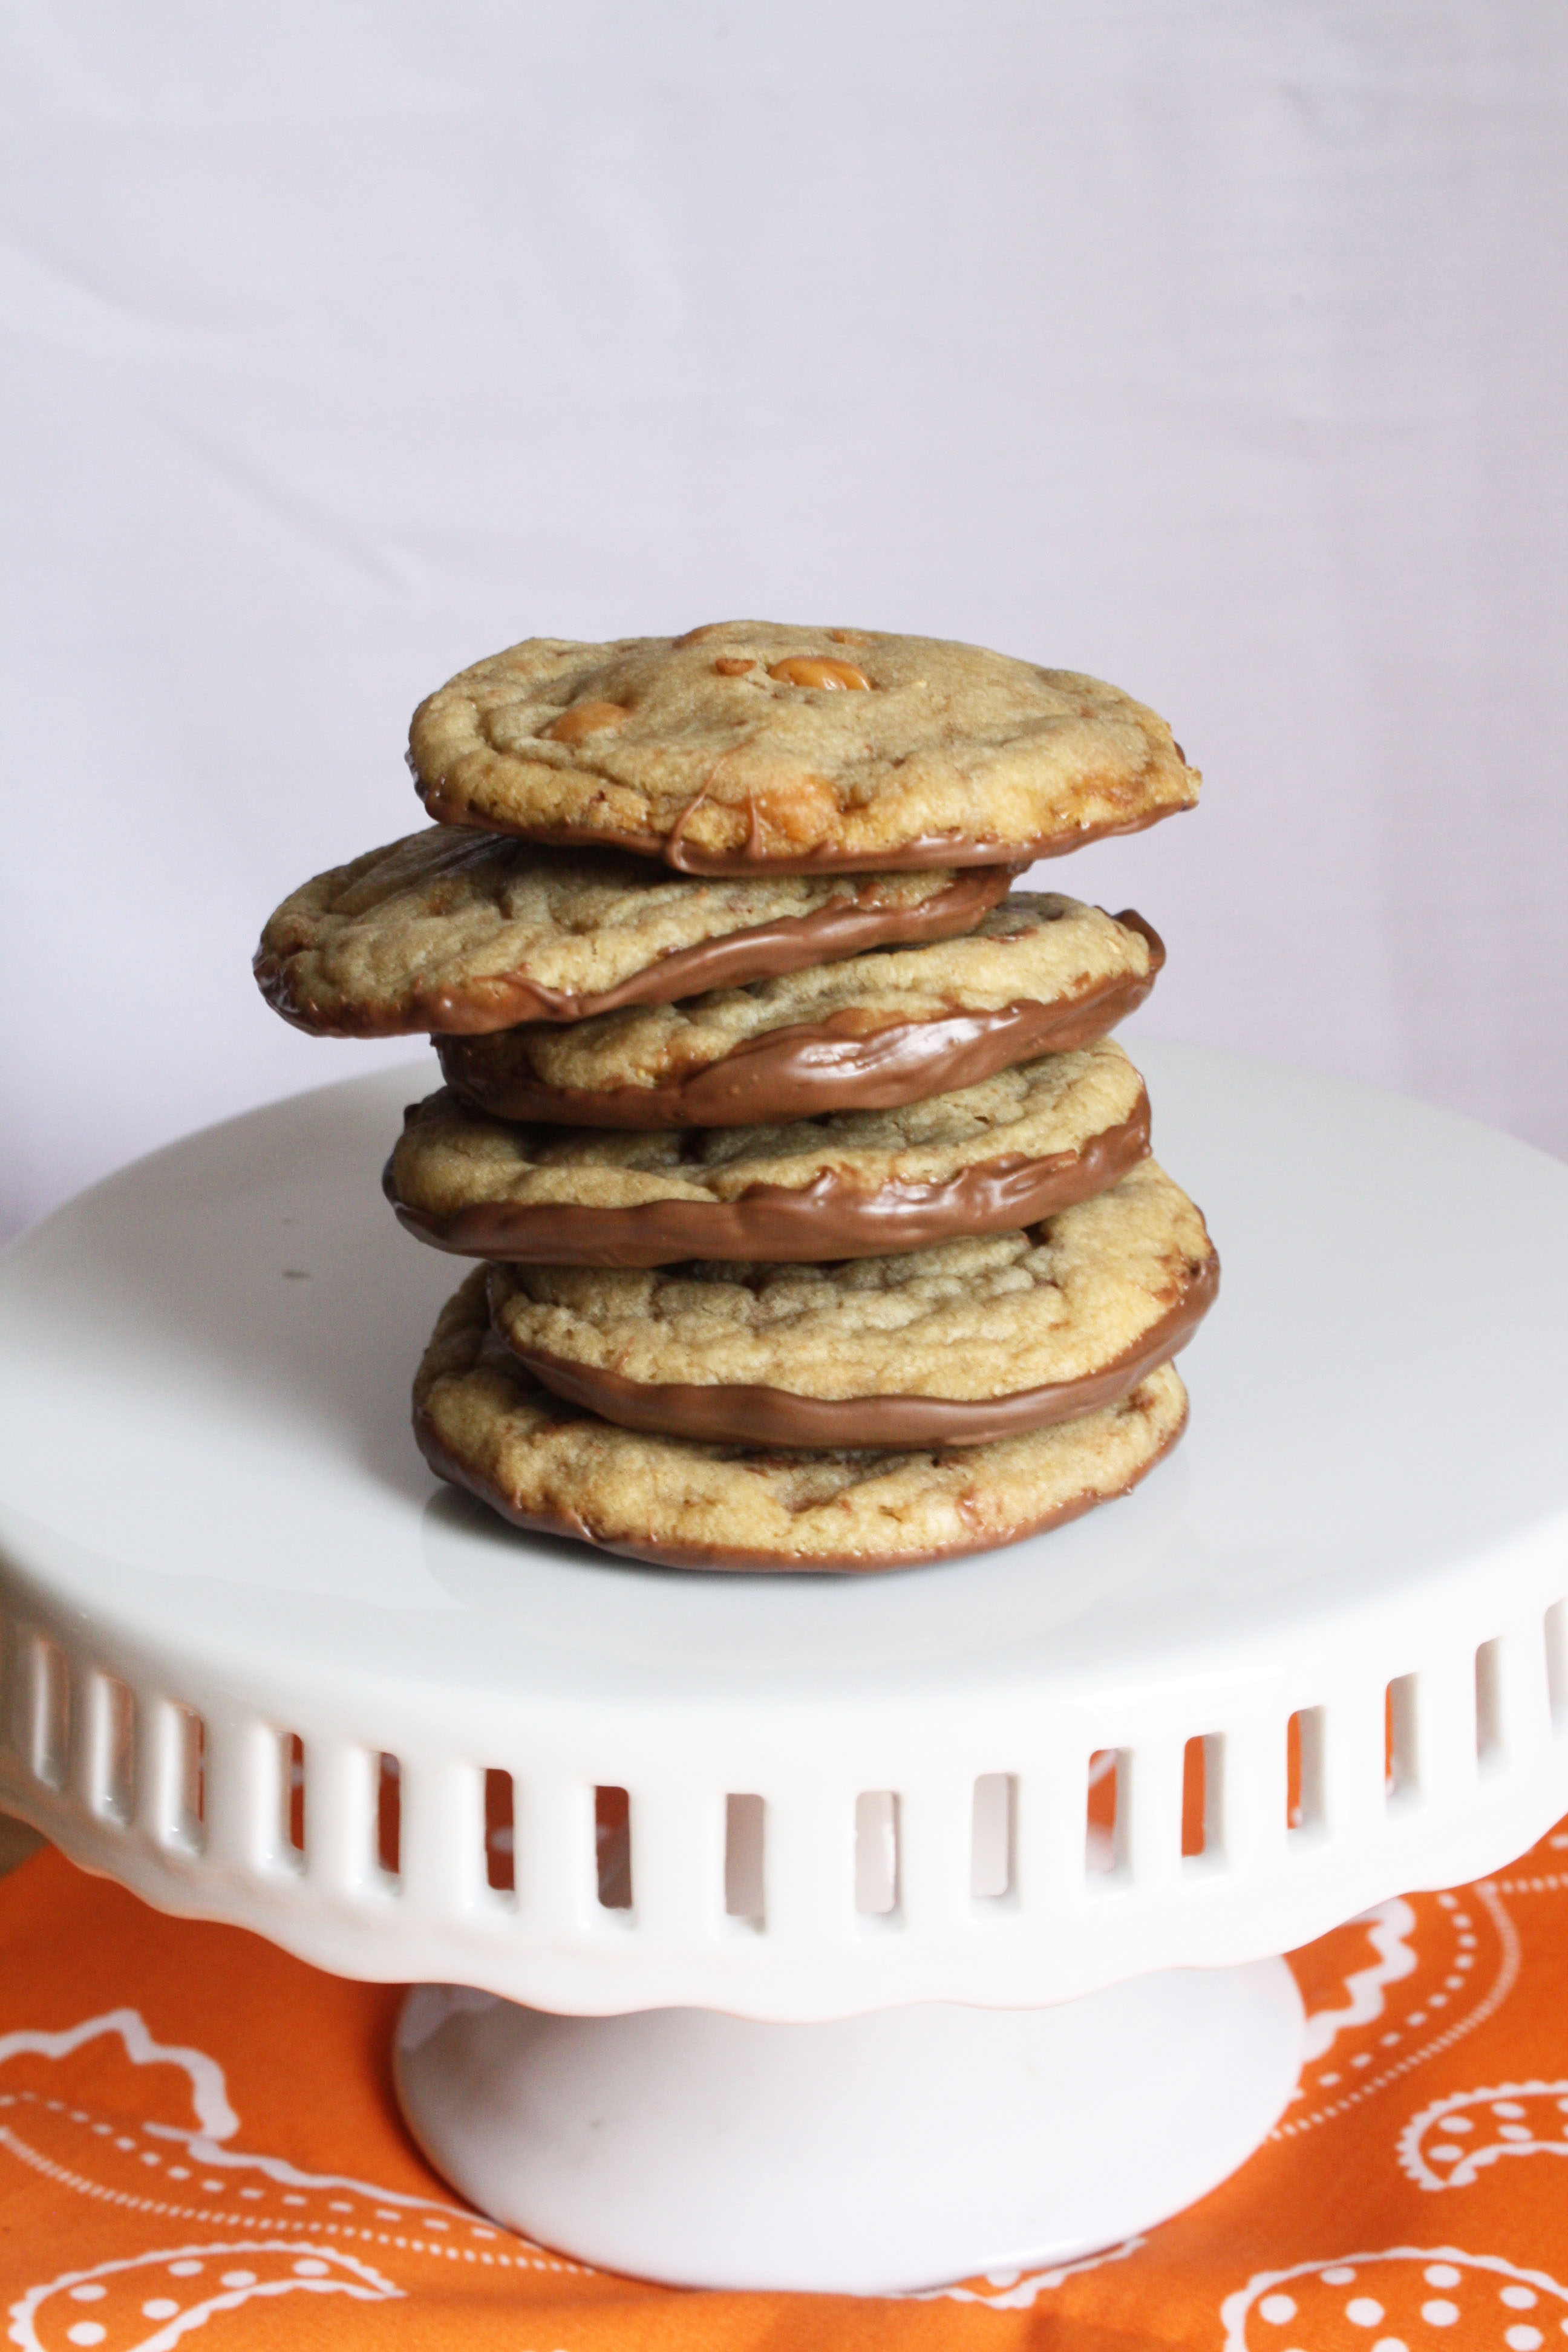
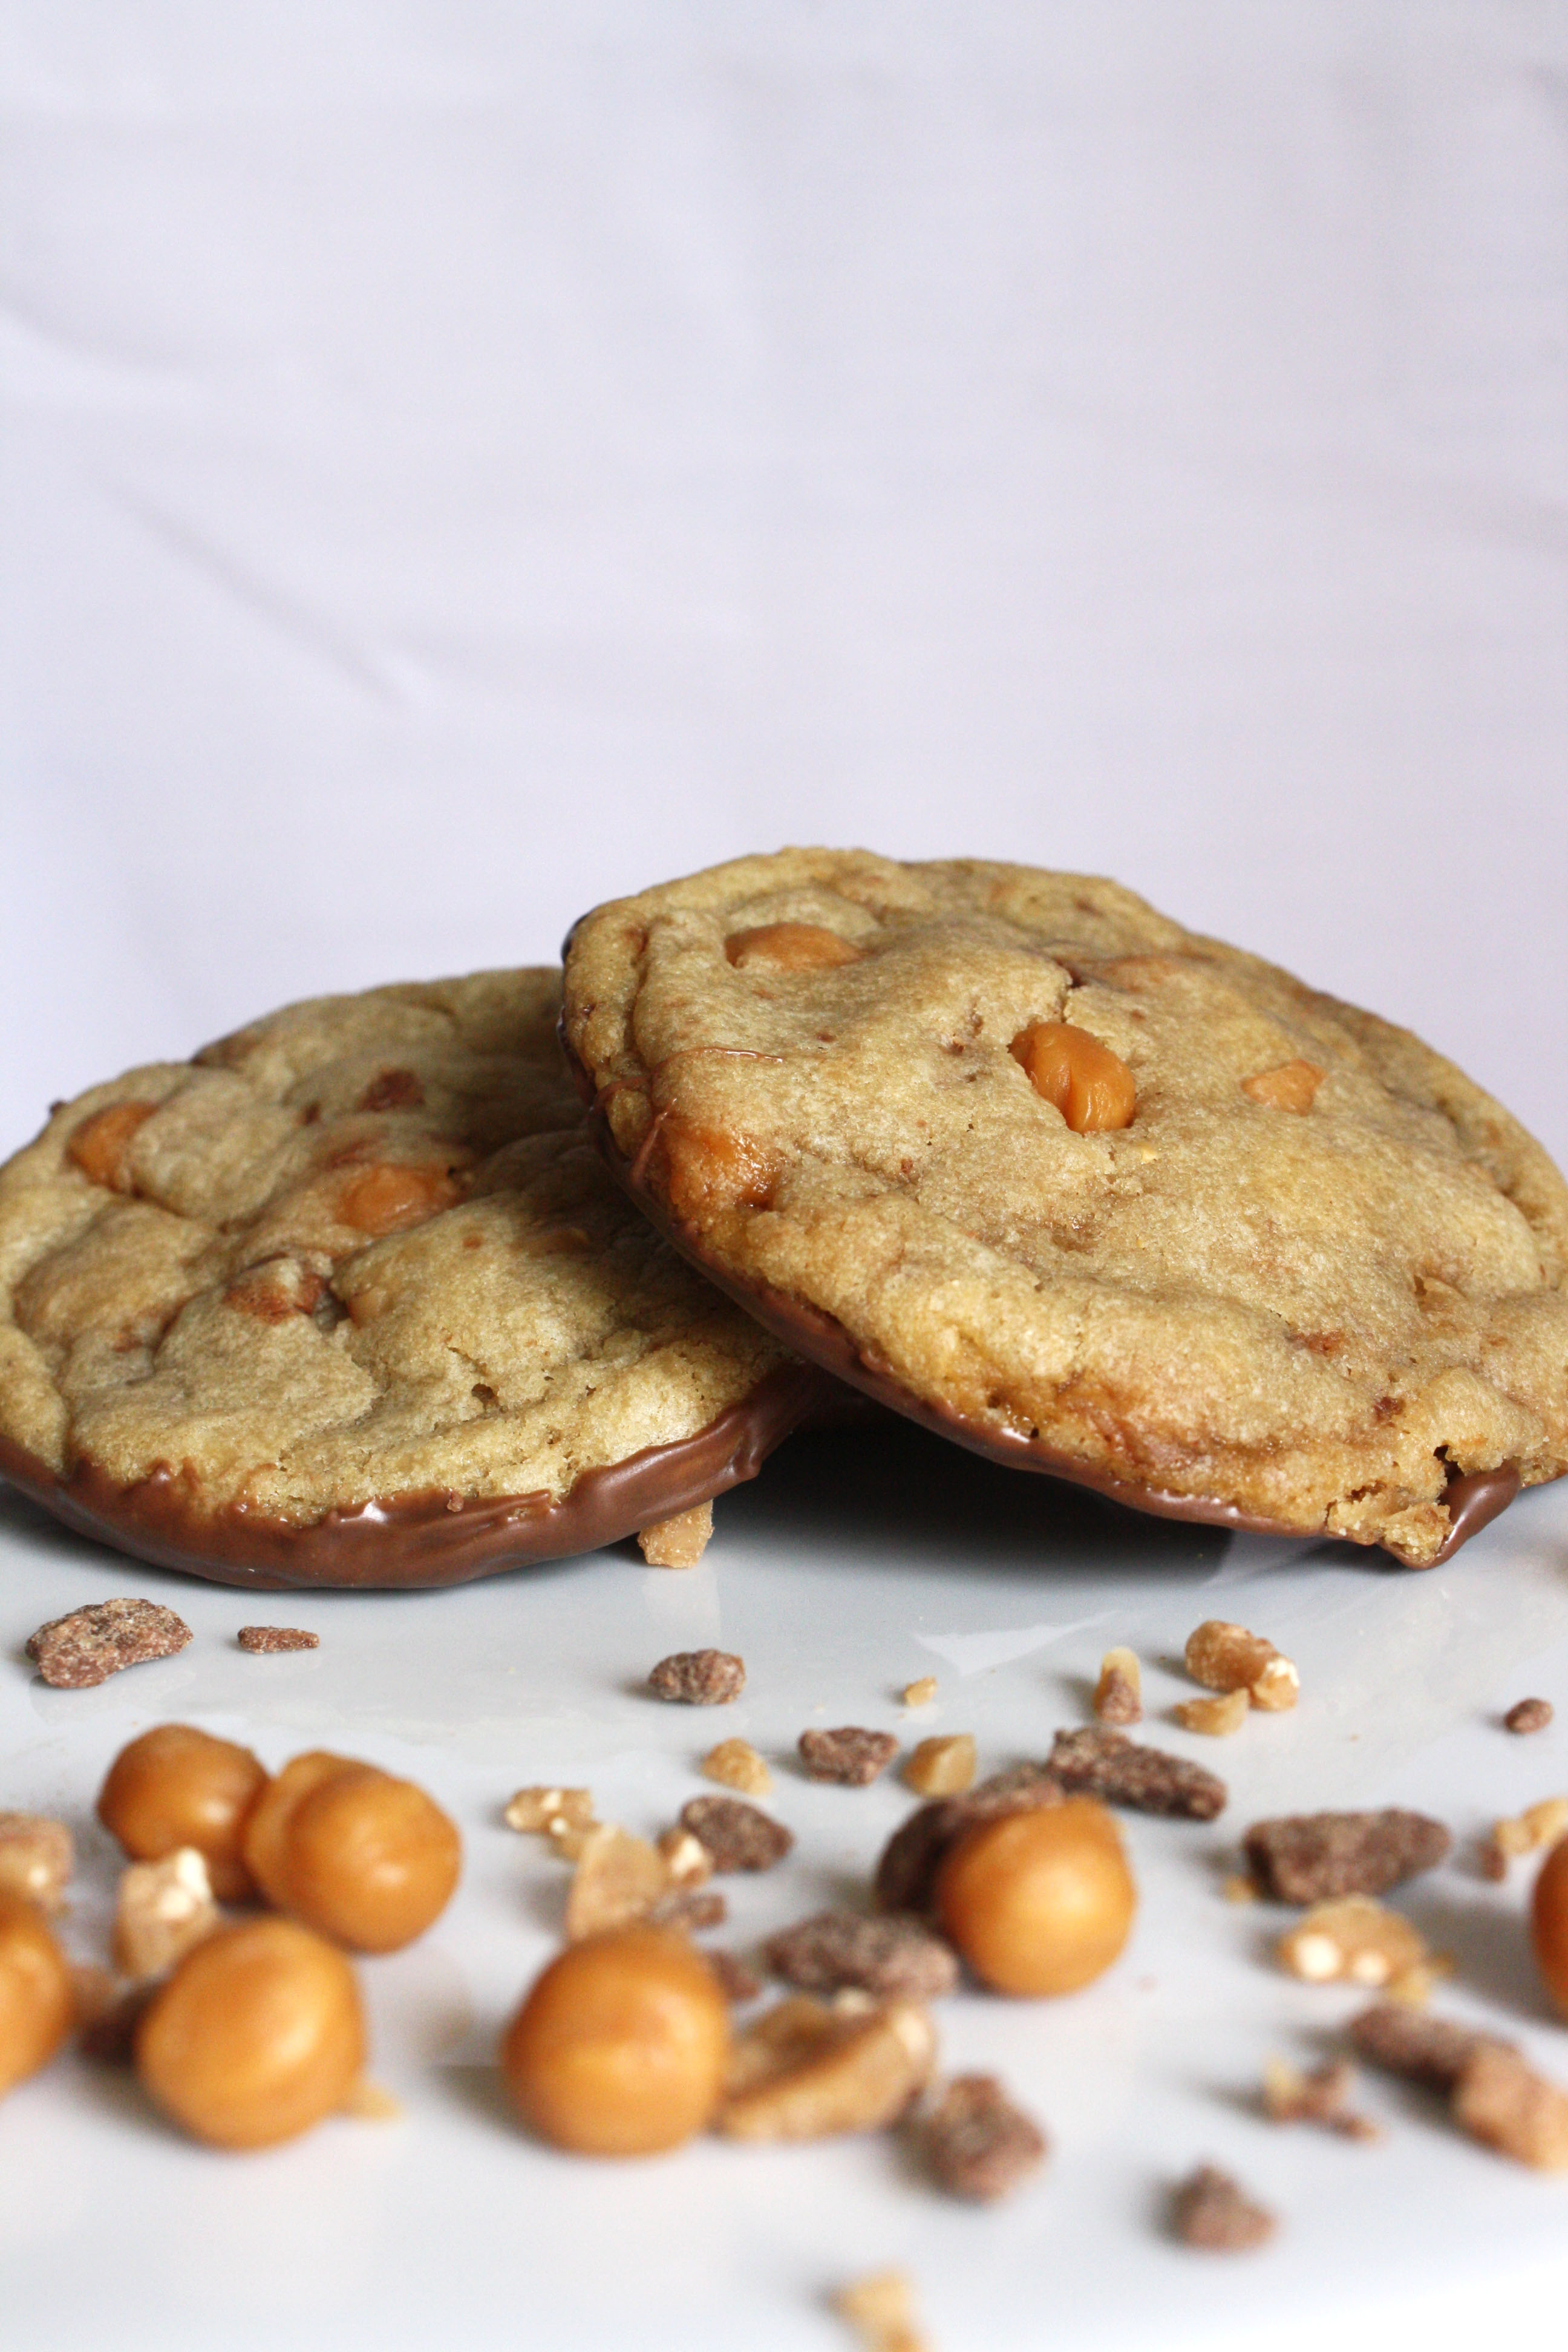
Caramel & Milk Chocolate Toffee Swirled Ooey Gooey Soft & Chewy Cookies Dipped in Milk Chocolate.
Caramel Toffee Chocolate Dipped Cookies
Pretty delicious sounding, right? Okay, maybe you didn’t drool, but you can definitely see what I mean about the length. And, I’m betting you are (or, at least highly considering) moving this recipe to the top of your To Bake List. Do yourself a favor, move it to the top. There will be no regret.

In fact, Matt (my brother) claims these are the best cookies I have ever made. Well, his exact words were: “These are probably the best things you’ve ever made. Seriously, the amount of flavor and softness in this cookie, much better than some of that cardboard sh*t you’ve made.” Yeah, I live with some hard critics. And, no, I don’t think anything I’ve ever made tastes like cardboard. Definitely an exaggeration on his part, but I’ll let you be the judge of that. Feel free to stop by for a taste testing of my baking skills any time you’d like. You’re always welcome.

Caramel Toffee Chocolate Dipped Cookies
I want to tell you about this cookie recipe. I dreamed up the flavor combination about two weeks ago. So, why did I wait so long to actually make them, you ask? Two reasons. Weirdly, they both start with an h. The first is hockey.

I have become a hockey fan. Like, a pretty big hockey fan. And no, it’s not just because the Stanley Cup Playoffs are happening right now. Or, because my best friend since the fourth grade is the biggest hockey fan I know and has been trying to get me to like hockey for years. And, it’s not even because I went to a playoff game a few weeks ago and fell completely in love with a hockey player (seriously, go look up Tyler Seguin. Isn’t he just beautiful? Yes, he is at the top of my celebrity crush list. Don’t judge me.). It’s because I like the sport. It’s fast paced, it’s exciting to watch, and even though I’m not a violent person, I think it’s pretty awesome that hockey players can just start fighting in the middle of the game. It takes talent to throw a punch while wearing ice skates. I, for one, am impressed.

The second reason is the heat. I’m all in for some sun, occasionally. Honest. I’m coming around to the whole warm weather situation. I like being able to wear sundresses and sandals, eat popsicles, and leave the house without a jacket. I really do. But, when I can’t turn on my oven because it’s simply too hot, I don’t like it. At all. Thankfully, the weather finalllllly cooled down. Hence, these beauties making their way into the oven to be baked into absolute deliciousness.

Caramel Toffee Chocolate Dipped Cookies
I know I’m raving on and on about these cookies, and I’m sure you’re thinking “Yeah, okay Meggan”, but in all seriousness, these cookies do deserve all the hoopla. The flavor combination of the caramel, toffee, and chocolate, on its own, is heavenly, but to pair it with literally the best cookie dough base recipe ever, pushes these cookies over the top. I’m in absolute love with this cookie dough recipe, and I plan on using it as the base for all future cookies I make. That’s how good it is. Which is why I need to take a moment to thank Sally from the blog Sally’s Baking Addiction. Thank you for creating this cookie dough recipe! You truly are a baking goddess.

Caramel Toffee Chocolate Dipped Cookies
Yields: 24 Cookies

Ingredients:
2 ¼ cups all-purpose flour
1 ½ teaspoons cornstarch
1 teaspoon baking soda
½ teaspoon salt
¾ cup golden brown sugar
½ cup granulated sugar
¾ cup unsalted butter, melted
1 egg + 1 egg yolk
2 teaspoons vanilla
¾ cup caramel bits
½ cup milk chocolate toffee bits
1 1/3 cup milk chocolate candy melts

Directions:
In a large bowl combine flour, cornstarch, baking soda, and salt. Set aside.
In a medium-sized bowl whisk together melted butter and sugars until no clumps of brown sugar remain.
Whisk in the egg, and then the egg yolk. Add vanilla. Whisk until combined.
Pour the wet ingredients into the dry mixture and mix together with a rubber spatula until combined. The dough will be soft, but very thick to work with.
Using a spatula fold in the caramel and milk chocolate toffee bits—because of the melted butter, they may not stick to the dough, but do your best to evenly spread them throughout.
Cover the dough and let chill for at least 2 hours, or up to 3 days—I let mine sit overnight. Chilling is mandatory for this recipe though—trust me, it’s worth it!
Take the dough out of the refrigerator and allow to slightly soften at room temperature for about 10 minutes.
Preheat oven to 325 degrees, and line a cookie sheet with parchment paper. Set aside.
Roll the dough into about tablespoon sized balls. The dough will be crumbly and tough to work with, but the warmth from your hands will allow the balls to stay intact.
Bake for 11-12 minutes. The cookies will look underbaked and very soft. Let them sit on the cookie sheet for 10 minutes, to continue baking, before moving them to a wire rack to cool completely.
Once cookies have completely cooled, melt the milk chocolate candy melts in a microwave safe bowl, in 15 second intervals, until of drizzling consistency. Dip the bottoms of the cookies in the melted chocolate or spoon chocolate on the bottom of the cookies and spread evenly until covered (I preferred this method!). Place chocolate dipped cookies upside down on wax paper until chocolate has completely hardened.

*Cookie Dough recipe from Sally’s Baking Addiction


Caramel Toffee Chocolate Dipped Cookies

Glazed Bailey’s Scones

Glazed Bailey's Scones
Glazed. Bailey’s. Scones.

Enough said, right?

Probably, but I’ll still say a little bit more.

I don’t know if I’ve told you this, but I don’t really do breakfast. Like at all. It’s nothing against breakfast food either, because I do love me some breakfast burritos, hash browns, omelettes, oatmeal, and cinnamon rolls any other time. Usually not all at once though. It’s more the time of day, I think. I just don’t wake up hungry. If we are being honest, I wake up thinking: t-minus 10 minutes until the Keurig makes me my morning cup of coffee. That’s all I want need in the mornings for me to be good to go. But, sometimes, I like to switch things up. Add a little spice to my morning routine. Really start my day off with something more than just a cup of coffee.

Glazed Bailey's Scones

Oh hello Bailey’s. How nice of you to stop by. Lets take a minute to talk about Bailey’s Irish Cream. Show of hands, please, as to who thinks it’s simply delicious? I see everyone is raising their hands, which means we all agree. Good. I knew we were friends for a reason.

I, myself, am a huge fan of Bailey’s. Bailey’s with milk? Fantastic. Bailey’s with coffee? Even better. Bailey’s baked into a scone and then dipped in your coffee? Possibly the best way ever to start your morning. Not even kidding.

Glazed Bailey's Scones

Scones and I have a love-hate relationship going on. When they are too dense or too hard, I dislike them, but when they manage to reach that perfect balance between a hard exterior and moist/tender interior I love love love them. Are you wondering where these scones stand? These scones reached that perfect balance of a slightly crisped exterior with a soft, light, and flavorful interior. And, honestly, I’m surprised by that. This was my first time making scones, and I’ll admit, I was a little nervous. The recipe was so easy and quick to put together that I was fairly certain I was going to end up with rock-hard scones that tasted horrible. But, that wasn’t the case at all!

Glazed Bailey's Scones

These scones are moist, lightly infused with Bailey’s, drizzled with a Bailey’s glaze (because, really, can you ever have enough?), and then sprinkled lightly with some cocoa powder. The Bailey’s flavor is very subtly, you won’t be getting drunk off these little guys, but there is enough there for you too taste it. I don’t know if it was beginners luck or if Bailey’s was just meant to be put into scones, but these little scones definitely spiced up my morning. In a good way. I vote you switch up your morning routine too. You won’t regret it.

Glazed Bailey’s Scones
Yields: 32 small scones

Ingredients:
Bailey’s Scones
3 ¼ cups all-purpose flour
1/3 cup + 1 tablespoon sugar, divided
2 ½ teaspoons baking powder
½ teaspoon baking soda
½ teaspoon salt
¾ cup cold unsalted butter, cubed
1 cup + 1 ½ tablespoons Bailey’s Irish Cream, divided

Bailey’s Glaze
1 cup powdered sugar, sifted
¼ cup Bailey’s Irish Cream
1 tablespoon unsalted butter, softened

Directions:
Bailey’s Scones
Preheat oven to 425 degrees. Line a cookie sheet with parchment paper. Set aside.
In a large bowl, whisk together flour, 1/3 cup sugar, baking powder, baking soda, and salt.
Cut in the butter using a pastry cutter or your fingers until mixture forms coarse crumbs.
Using a spatula, stir in a cup of Bailey’s until just moistened.
Knead dough gently in the bowl until it is no longer sticky. Turn dough onto a parchment lined surface and divide in half. Using your hands, form the first half of dough into a rectangle that is about ¾-inch thick.
Using a sharp knife, cut the dough rectangle into 8 even squares. Then cut the 8 squares in half to create 16 smaller triangles. Repeat with the other half of dough.
Place scones on prepared baking sheet, about 1-inch apart. Brush tops with extra Bailey’s and sprinkle with remaining sugar.
Bake for 7-8 minutes or until lightly browned. Transfer scones to a wire rack to cool completely.
Once the scones have cooled, started working on the glaze. In a medium bowl whisk together powdered sugar, Bailey’s, and butter until smooth.
Drizzle generously over the scones and then sprinkle the tops with cocoa powder.

*scone recipe adapted from Taste of Home


Glazed Bailey's Scones

Braided Cookie Butter Bread

Braided Cookie Butter Bread Can we just talk about Cookie Butter for a second?

Or, an hour. Or, maybe the whole darn day. Really, lets never stop talking about it. It deserves that much attention. Am I right?

My love for Cookie Butter is very, very new. As in, I tried it for the first time a week ago. Gasp. How could I wait so long? What was I doing with my life? How was I missing out on so much deliciousness? All valid questions. Let me tell you what happened.

I saw the Cookie Butter madness on Pinterest—recipes for Cookie Butter cookies, Cookie Butter pie, and even Cookie Butter bars—but, in all honesty, I just thought people were being fancy with their naming of desserts. Or, that they were listing the things they put in their desserts. Or, even that they somehow managed to take a perfectly wonderful cookie and turn it into butter, which they then baked into another cookie—I’ll admit that last one seemed a little complicated and I really didn’t want to have anything to do it.

I know. I messed up. Big time.

Braided Cookie Butter Bread

I finally decided to see what all the fuss was about. Looking at the recipes, I realized Cookie Butter was a creamy spread, much like peanut butter, that tasted like crushed up gingerbread cookies. Needless to say, I was intrigued.

So, I bought a jar. Stuck the tip of my spoon into it. Took my first bite. And, then my second. And, fifth. And, then I smeared it on some bread. Ate that. And, then I proceeded to ask all my friends if they had tried this magical Cookie Butter, which most of them hadn’t. So, I of course, told them to sprint to Trader Joe’s and get some. Like now.

That my friends is how I fell truly madly deeply in food love with Cookie Butter [yes, I did just hear that song, if you know what I mean].

I debated what I would bake cookie butter into first. A cookie? Cake? Pie? Bar? There were endless options and tons of ideas popping into my head (don’t worry, I will be sharing another Cookie Butter related post at some point!!), but then I saw this Braided Nutella Bread, and knew I had found THE recipe. Would now be a bad time to mention I also just recently tasted Nutella? Probably. That’s a story for another day.

Please give a warm welcome to this Braided Cookie Butter Bread. Oh, is that chanting I hear? You guys are so kind!
Braided Cookie Butter Bread

Cookie Butter swirled into a homemade bread loaf. Really, what more can I say? The Cookie Butter caramelized itself on the outside of the loaf as it bakes, giving it a little crunch, and stays creamy and soft in the inside. Honestly, I can’t say more. Just go make this bread already. 

Braided Cookie Butter Bread
Recipe adapted from Inspired by Charm
Yields: 1 loaf

Ingredients:
1 packet (2 ¼ teaspoons) active dry yeast
1 teaspoon sugar
1 cup water, warmed (temperature should be between 100-110 degrees, about 30 seconds in the microwave)
2 ½ cups all-purpose flour, plus more for dusting
1 teaspoon salt
½ cup Cookie Butter (I bought mine at Trader Joe’s)
1 egg, beaten with a tablespoon of water

Directions:
In a small bowl, dissolve yeast in a ¼ cup of the water. Mix in the teaspoon of sugar and let sit for ten minutes to activate.
In the bowl of a stand mixer combine flour and salt. Add the active yeast and remaining ¾ cup of water. Mix on low with the dough hook until just combined. Turn speed up to medium and mix for about 7 minutes or until dough is of a smoother looking consistency—the dough should be a little sticky, but still be able to hold it’s shape.
Place dough in a lightly oiled bowl and cover the top with plastic wrap. Let sit in a warm spot for about an hour or until dough has doubled in size.
On a lightly floured surface, roll out the dough to form a 12-inch x 15-inch rectangle. Spread the Cookie Butter—I found warming it in the microwave for about 10 seconds made it easier when spreading—evenly on the surface, leaving about a ½-inch border of dough. Roll the dough tightly (starting with the longer side) up. Using a sharp knife, cut the rolled dough down the middle, making sure to leave one end intact. Twist or ‘braid’ the dough over the top of each other. Place braided dough on top of a parchment-lined baking sheet that has been lightly sprinkled with flour. Cover loosely with a towel and let sit for 20 minutes.
Preheat oven to 350 degrees. Brush surface of the braided dough with egg wash. Bake bread for 25 to 30 minutes or until bread is lightly browned. Remove from oven and let cool slightly before digging in.


Braided Cookie Butter Bread

Lemon Oreo Creme Bars

Lemon Oreo Creme Bars I’ve told you how much I love Oreos and peanut butter. How I like to dip to smother said Oreo with as much creamy peanut butter as possible before stuffing it into my face. Not very lady like, I know.

That’s my comfort food. My pick me up. Oreos, peanut butter, and a large glass of milk. That’s what I eat when I need to feel happy. BUT, sometimes (very rarely) there isn’t a jar of peanut butter around. And I’m left with just regular Oreos and milk. And, guess what? That’s perfectly fine too.

The thing is, I like Oreos in general. With or without peanut butter. Double stufed or not. Flavored filling or regular. I’m an Oreo lover. Period. No ifs, ands, or buts about it.

I’m that girl who walks down the cookie aisle every time I go to the market just to see if a new flavor or a seasonal/holiday themed Oreo has come out. And, of course, if something new is out, I have to buy it. Just to try it or to see the different designs up close. I mean, come on, Nabisco went through alllllll that trouble to create this cookie and it would simply be rude not to purchase a pack.

I, for one, am not rude (or, I try never to be rude), which means I buy the Oreos. What can I say? My mom raised me right.
Lemon Oreo Creme Bars Double Stufed Oreos? Been there, done that. A few times.

Mini Oreos? How could I not purchase them? They’re so tiny and cute.

Chocolate, Peanut Butter, Golden Oreos? Yup. Tried those too. Birthday Cake, Gingerbread, Mint, Coconut, Candy Corn, Marshmallow Creme, Berry Burst? Yeahhh, basically if you can name it, I’ve most likely tried it. And, sure, I like some flavors better than others, but I try to give each new creation a fair shot. I try one cookie, and if I like it, I eat more. Sometimes I like it so much that I make an immediate market run to buy another pack—you never know when they’ll be off the shelves.

This brings us to Lemon Creme Oreos. I bought a pack, ate one cookie, and within two days, the pack was gone. And, no that wasn’t just me eating them. Come on people, who do you think I am? Some sort of Oreo Junkie? Pssh. Not me…

Lemon Oreo Creme BarsThe fact that I like these Lemon Creme Oreos is actually a little weird. Why? Well, lets just say I don’t really like lemony things. At all. As in, I’m not a fan of lemon bars or really anything with lemon, with the sole exception being lemonade. And, now these Oreos. And, these Lemon Oreo Creme Bars too.

I figured since I liked the Lemon Creme Oreos so much, I’d give the whole lemon bar situation another try. I wanted to make a lemon bar that basically tasted just like these Oreos: creamy, not too tart, but not too sweet, and not overwhelmingly lemony.

Lemon Oreo Creme Bars These Lemon Oreo Creme Bars have a lemon Oreo crust, are filled with a creamy lemon filling, and then sprinkled with crushed lemon Oreo cookies (minus the lemon filling). If all lemon bars tasted like this I would eat them on the regular. Seriously, these bars are perfect for lemon lovers and non-lemon lovers alike. They are creamy, lemony, but not in an overpowering way, and the perfect balance between sweet and tart. Did I mention super easy and quick to put together too?

Lemon Oreo Creme Bars
Yields: about 9 large bars

Ingredients:
Lemon Oreo Crust
20 Lemon Creme Oreos cookies
3 tablespoons unsalted butter, melted

Lemon Creme Filling
1 (14 oz.) can sweetened condensed milk
¼ lemon juice
2 ½ teaspoons grated lemon peel

Oreo Topping
7 Lemon Creme Oreos cookies, with the filling scooped out, crushed

Directions:
Preheat oven to 350 degrees and line an 8×8 or 9×9 pan with parchment paper. Set aside.
In a food processor pulse the whole Lemon Creme Oreos into a coarse crumb. Pour crumbs into a medium-sized bowl and stir in the melted butter. Press crust into the lined pan and bake for 9 to 10 minutes. Let sit on top of the stove as you prepare the filling.
In a medium-sized bowl combine sweetened condensed milk, lemon juice, and grated lemon peel. Pour over the warm crust—use a spatula to make sure it’s spread evenly.
Sprinkle the crushed Oreo Cookies (with the filling scooped out) evenly on top of the lemon creme filling. Bake for 24 to 26 minutes, or until the top is a light golden brown.
Let cool to room temperature and then place in the fridge for 30 minutes before cutting into squares.

*lemon creme filling adapted from Betty Crocker


Lemon Oreo Creme Bars

Pumpkin Spice Shortbread Cookies

Pumpkin Spice Shortbread CookiesHave you heard the song “I Miss You” by Blink-182?

If you haven’t, there is a line that references The Nightmare Before Christmas: “ We can live like Jack and Sally if we want, where you can always find me, and we’ll have Halloween on Christmas”. These cookies remind me of Halloween on Christmas. Or, really it’s more of Christmas on Halloween. It’s the cookie cutters.

Cookie cutters instantly make me think of Christmas time. Specifically, it makes me think of sitting at the table, covered in flour, wearing an over-sized apron, as my two younger cousins and I frost and sprinkle (in an excessive amount that only an eight year old would consider edible) our sugar cookies.

One of my cousins, Jason, was even around as I glazed and took photos of these cookies. Actually, he always seems to be around during my dessert photo shoots. I think it’s so he can pick out which slice or cookie to eat first. In this case, he went for the owl. Followed by two bats. And later, a ghost.

Even though I’m a fan of enjoying each holiday as it comes (unlike the stores, who like to rub holidays in your face months in advance…I’ve seen Valentine’s Day stuff already…Are you kidding me?), it was actually kind of nice to think of these as Christmas on Halloween cookies. It really put me in a festive mood and made me even more excited for my future holiday baking, which I didn’t think was possible.

Pumpkin Spice Shortbread Cookies

These Pumpkin Spice Shortbread Cookies are the perfect fall treat! The shortbread cookie itself is simple to make and has a buttery flavor with a subtle hint of pumpkin spice. The glaze is made from pumpkin spice flavored candy melts, giving each bite the perfect punch of pumpkin spice. So, if you’re in need of a pick me up, some festive spirit, or just a delicious pumpkin flavored cookie, make these. Get in your kitchen. You won’t regret it. And your relatives, like mine, will happily devour them.

Pumpkin Spice Shortbread Cookies
Yields: about 40 cookies

Ingredients:
Shortbread Cookies
½ cup (1 stick) salted-butter, softened
3 oz. cream cheese, softened
1 cup powdered sugar
½ teaspoon baking powder
½ teaspoon pumpkin spice
½ teaspoon salt
1 egg
1 ½ teaspoons vanilla
2 ¼ cup all-purpose flour

Glaze & Decorations
1 bag pumpkin spice candy melts
1 cup black candy melts
4 teaspoons shortening (plus some more if melts start to harden)

Directions:
Shortbread Cookies
In a large bowl, cream together butter and cream cheese, until well combined.
Gradually add the powdered sugar, baking powder, pumpkin spice, and salt. Beat until combined.
Add eggs and vanilla. Mix until incorporated.
Slowly beat in flour, until mixture forms into dough.
Cover the bowl with plastic wrap and place in the refrigerator. Let chill for about an hour or until dough is easy to handle.
Once dough has chilled, preheat the oven to 375 degrees.
On a lightly floured surface, roll out dough until about ¼ inch thick. Using cookie cutters, cut out dough.
Place cutouts an inch apart on a ungreased baking sheet. Bake for 5-7 minutes (I found the bats cooked faster and were done around 5 ½ minutes, but the bigger cutouts took a little longer) or until the edges start to lightly brown.
Transfer cookies to a wire rack and let them cool completely (I let mine sit over night).

Glaze & Decorations
In a microwave safe bowl, melt a cup of pumpkin spice flavored candy melts and two teaspoons of vegetable shortening. Microwave in 15 second intervals, stirring after each interval, until the mixture is smooth (the hotter the mixture, the easier it is to glaze the cookies).
When glazing, I found that pouring the mixture into a piping bag or Ziploc bag (with the tip cut off) was extremely helpful. Pipe the outline of the cookie first and then fill the inside with glaze.
If the glaze begins to harden, add some more vegetable shortening and microwave until it becomes smooth.
Once all the cookies have been glazed orange, melt a cup of the black candy melts and two teaspoons of vegetable shortening. Microwave in 15 second intervals, until smooth.
Using a toothpick (or, a piping bag if that’s easier for you) add faces to your cookies—remember, it’s Halloween, so have fun with your faces and don’t stress if they aren’t perfect!

 
Isn’t the skeleton cup the cutest thing ever? Don’t even get me started on the napkin…

Pumpkin Spice Shortbread Cookies