Peekaboo Pumpkin Cream Cheese Pound Cake

PeekabooPCCPCakeMy laptop decided to take a nap.

Really, a permanent nap. And it refused to be awaken. So, I took it to be repaired. And this little repair, left me computer less for about two weeks. This is partly to blame for my lack of posting recently.

The other part, you can blame, is a few failed dessert photo shoots and my need for every picture to be perfect. I admit it, I’m somewhat of a perfectionist. Especially when it comes to this blog and the recipes I provide you. I just want you all to be happy with the taste and look of the final product…Can you blame me?

The one good thing about taking this baking break is that I was able to prioritize my ‘To Bake’ list. Meaning, that I have some really good recipes in the works (a lot of which involve pumpkin…the season simply demands it) that I CANNOT wait to share. You have been warned of the future deliciousness. Prepare your kitchens, stock your cupboards, and be ready for your stomach to growl in happy anticipation.

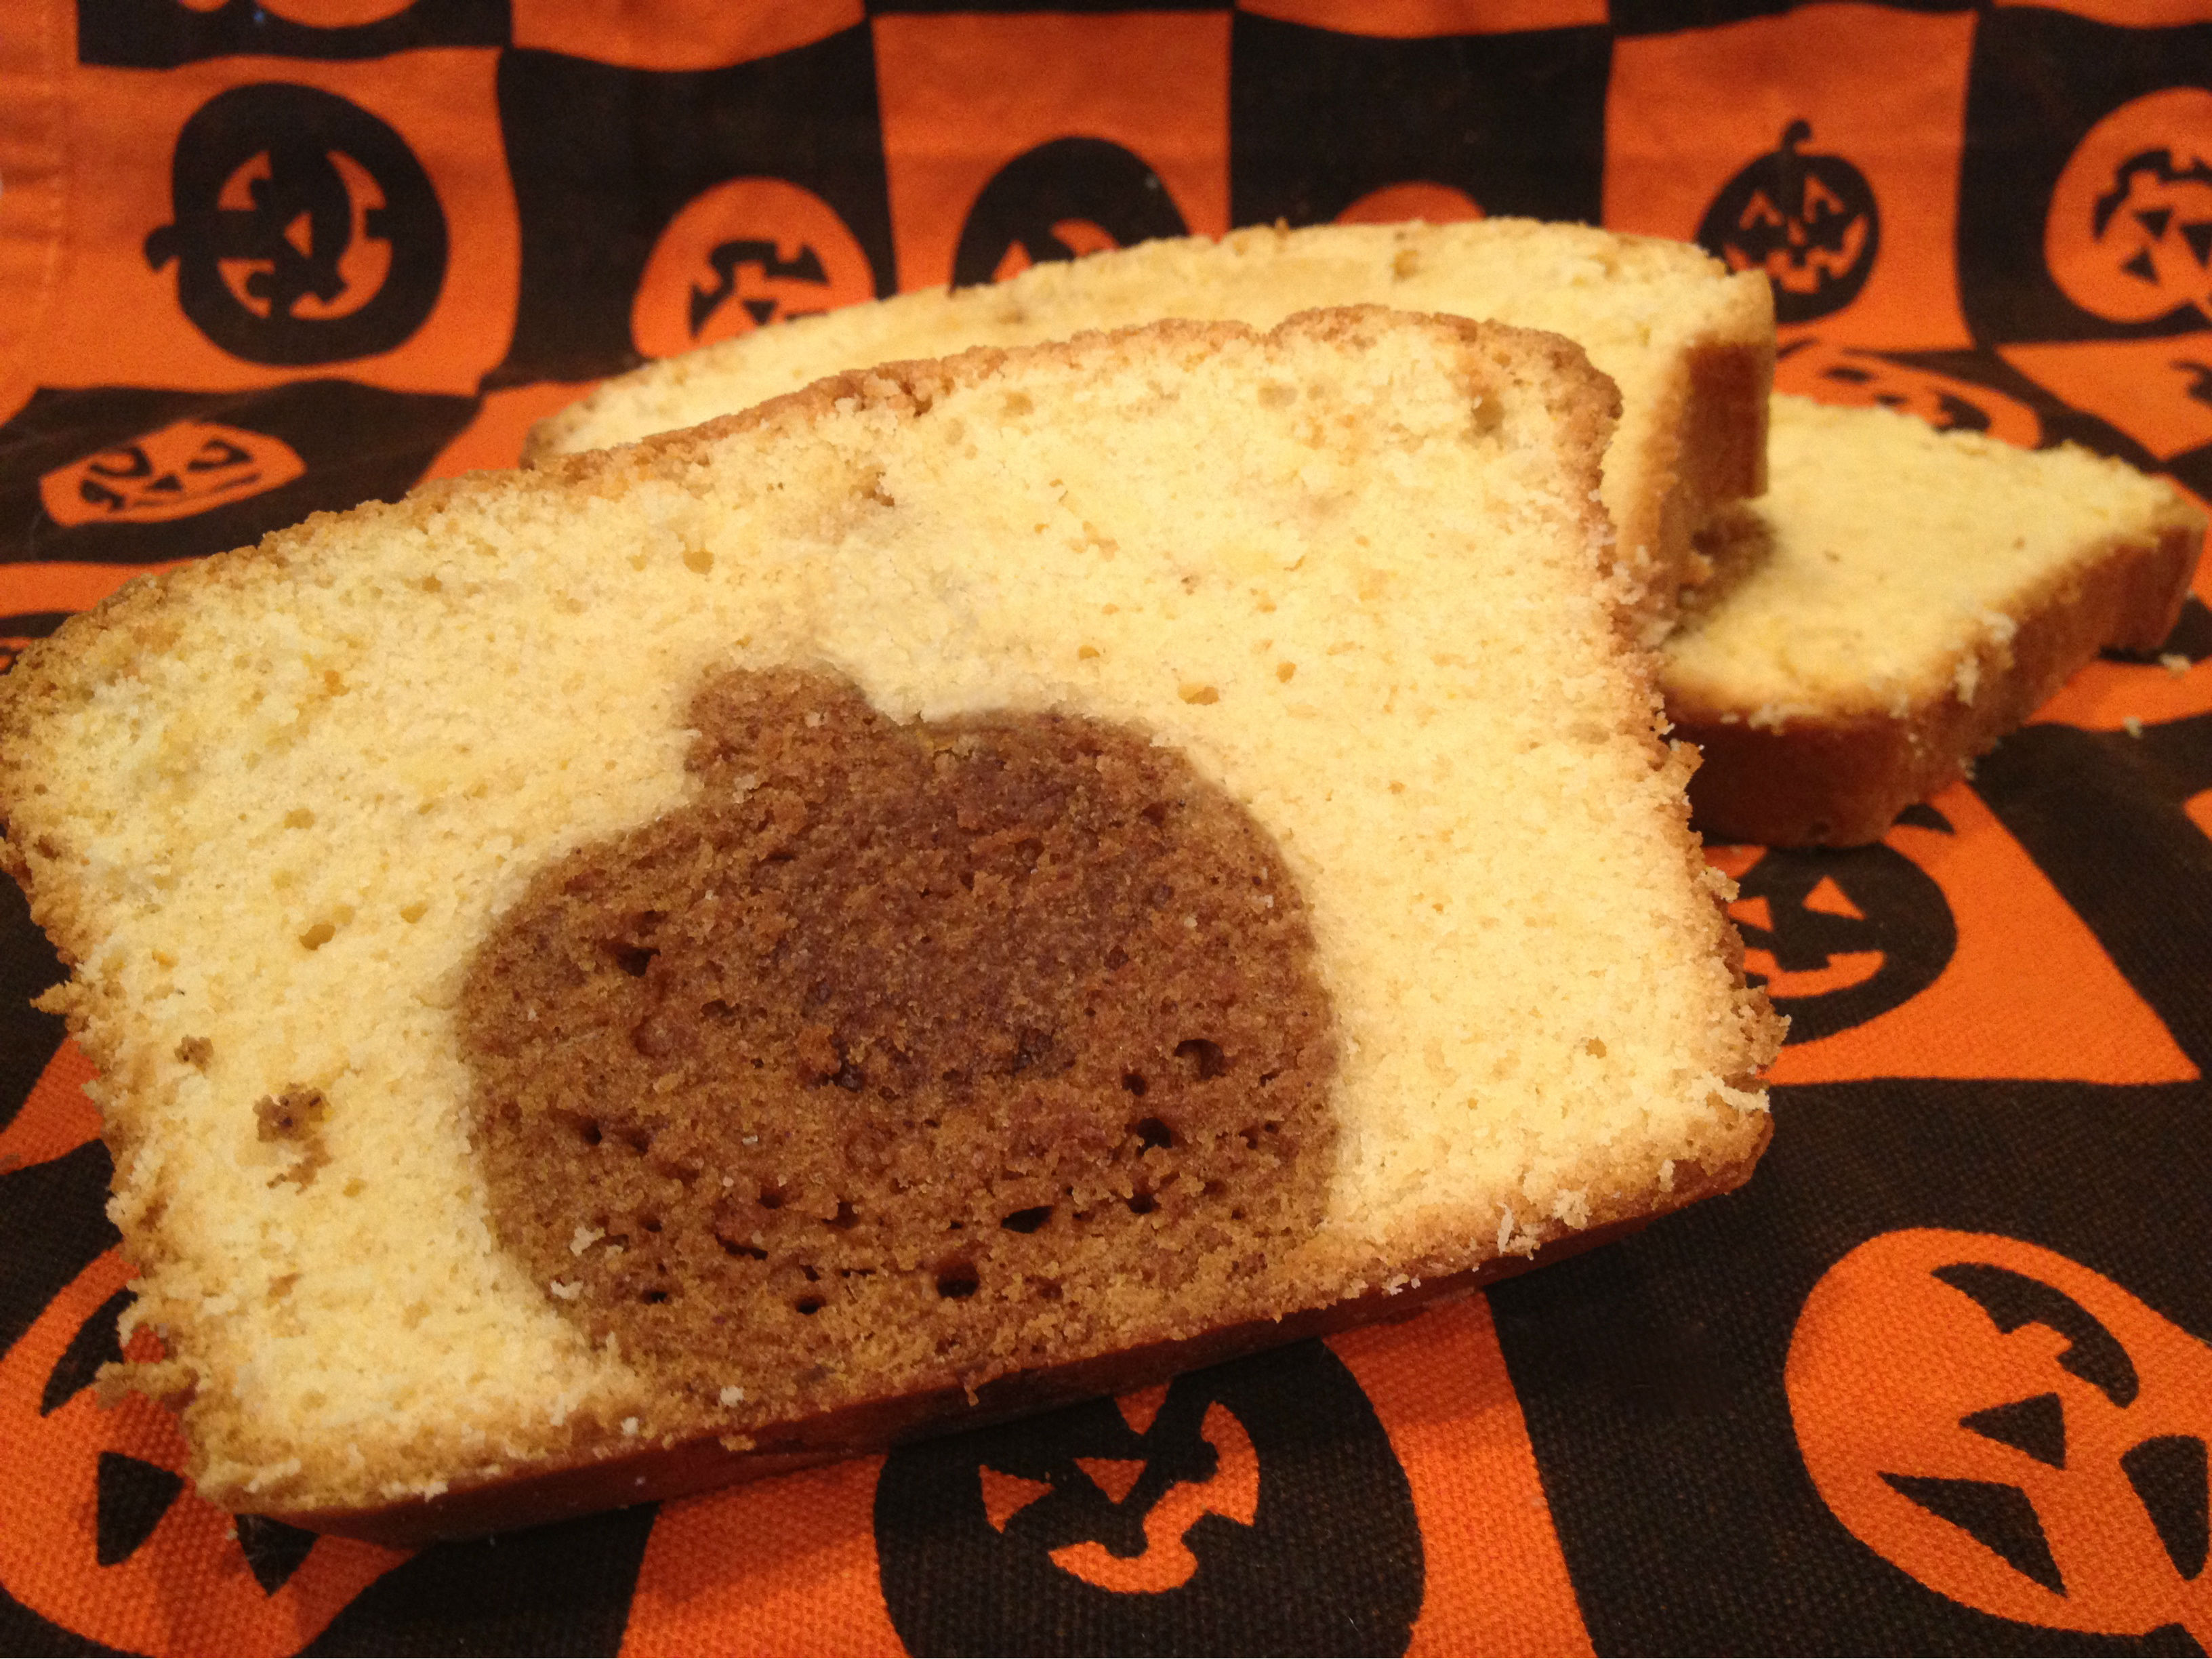
Now, can we just talk about how cute this Peekaboo Pumpkin Cream Cheese Pound Cake is? Just look at it.

PeekabooPCCPCake

Aside from being ridiculously cute, this cake is extremely delicious. Did I mention it’s actually pretty easy to make too? The peekaboo pumpkin is made from a box mix of pumpkin bread and maintains the wonderfully warm and cinnamony undertones you would find in the bread. The surrounding cream cheese pound cake is a homemade cake that contains both regular and pumpkin flavored cream cheese, giving it a slightly pumpkiny aftertaste. As a whole, the cake is extremely moist and both the pumpkin and cream cheese flavors are present in every bite!

Peekaboo Pumpkin Cream Cheese Pound Cake
Cake concept from SheKnows
Yields: One 9×5-inch loaf (+ about 6 cupcakes)

Utensils:
Medium sized pumpkin silicon molds (if you don’t have molds, you can use a pumpkin shaped cookie cutter—see the SheKnows website for directions on how to proceed).

Ingredients:
Pumpkin Bread
1 box pumpkin bread (I used the Trader Joe’s brand)
2 eggs
½ cup vegetable oil
1 cup water
food coloring

Cream Cheese Pound Cake
1 ½ cups (3 sticks) salted butter, at room temperature
4 oz. cream cheese, at room temperature
4 oz. pumpkin spice cream cheese, at room temperature
3 cups sugar
6 eggs
3 cups all-purpose flour, sifted
1/8 teaspoon salt
1 tablespoon vanilla

Directions:
Pumpkin Bread
Preheat oven to 350 degrees.
In a large bowl, combine pumpkin bread mixture, eggs, vegetable oil, and water. Stir until combined.
Add food coloring (2 red drops + 3 yellow drops=orange) to the batter until you feel the pumpkin is orange enough.
If you are using pumpkin silicon molds, pour the batter into the mold, filling it only about 2/3 of the way, and bake for about 10 minutes—the pumpkin will still be doughy in the center, but should be slightly firm on the sides.
The bread requires about 7 medium sized pumpkins, which means you’ll have extra pumpkin batter (with my extra batter, I made mini pumpkin shaped cupcakes using the mini pumpkin silicone molds, but I suggest making extra medium sized pumpkins just in case one falls apart while pulling it out of the mold).
Let pumpkins cool completely before gently removing them from the mold. Place pumpkins in a container lined with wax paper.
Refrigerate for at least four hours (I let mine sit over night).

Cream Cheese Pound Cake
Preheat oven to 300 degrees.
Cream together butter and both cream cheeses, until creamy.
Gradually add sugar, beating until combined.
Add eggs, one at a time, beating the mixture until each egg is incorporated.
In a small bowl, combine flour and salt. Slowly add the dry ingredients to the wet mixture.
Add vanilla. Mix until combined. Set cake mixture aside.

Assembly
Grease and flour a 9×5-inch loaf pan.
Remove the pumpkins from the fridge. Place pumpkins right side up (the bottom of the pumpkin touches the bottom of the loaf pan) in the middle of the pan in a line from one side of the pan to the other.
Pour the cream cheese pound cake mixture over the pumpkins, making sure to cover the pumpkins completely (there will be some left over cake batter, I made cupcakes with mine and placed the mini pumpkin cupcakes on top as a decoration).
Bake for about an hour and 50 minutes—if the top of the loaf is browning to quickly cover the pan with foil.
Let the cake cool completely (if you can) before cutting into it to reveal the inside.


PeekabooPCCPCake3

Peanut Butter & Honey Graham Cracker Cookies

Peanut Butter & Honey Graham Cracker CookiesIt’s been a while since I ranted about peanut butter.

Remember those Peanut Butter M&M Cookies? The one’s that were so delicious, even my non-peanut-butter-loving brother ate? Yup, those one’s. Did you make them? If you didn’t, it’s okay, but you really should. They are totally worth it.

You know what else is worth it? These Peanut Butter & Honey Graham Cracker Cookies.

Did I ever tell you that I don’t like jelly? As in I don’t eat it. Ever. Unless someone holds a whisk to my head and says ‘eat it or I will never let you bake again’—don’t worry that hasn’t actually happened yet. I just don’t like it. The texture, the flavors [yes, I’ve tried plenty of them], and the mushy appearance…really everything about jelly is a huge turn off for my tastebuds. Are you wondering if my dislike for jelly extends to peanut butter & jelly sandwiches?

The answer is that, yes, it does. When other kids were pulling out peanut butter & jelly sandwiches from their paper bag lunches, I would happily be pulling out a plain peanut butter sandwich. Usually half a sandwich. With the crust cut off. It wasn’t until much later that someone told me about peanut butter & honey sandwiches. I was skeptical. Honey with my peanut butter? Could it taste good? Or, would it be just a less chunky version of jelly?

Needless to say, it is not like jelly. And even though I still prefer plain peanut butter sandwiches, occasionally I mix in some honey. Because, in actuality, it’s not half bad. It’s actually kind of delicious, which is why I had to make it into a cookie.

Say helllllo to the tasty Peanut Butter & Honey Graham Cracker Cookie.

Peanut Butter & Honey Graham Cracker Cookies

This cookie tastes just like a peanut butter & honey sandwich. And that is in no way an exaggeration. The Peanut Butter & Honey Graham Cracker Cookie itself is graham cracker based and picks up the lightly sweetened honey flavor of a regular graham cracker. This super soft, moist, and melt in your mouth cookie is then drizzled generously with both peanut butter and honey. The creamy peanut butter drizzle and the sweetened honey drizzle combine perfectly with the graham cracker cookie to give you one mouthwatering dessert.

Peanut Butter & Honey Graham Cracker Cookies
Yields: about 50 cookies

Ingredients:
Graham Cracker Cookies
1 cup (two sticks) salted-butter, softened
¾ cup brown sugar
¾ cup sugar
2 teaspoons vanilla
2 eggs
1 ¼ cup all-purpose flour
1 cup (about 7 cracker sheets) honey graham crackers, crumbled into small chunks
½ teaspoon salt
1 teaspoon baking soda

Drizzle
5 ½ tablespoons peanut butter, melted
5 ½ tablespoons honey

Directions:
Cookies
Preheat oven to 375 degrees and spray a cookie sheet with cooking spray.
Cream together butter and both sugars, until light and creamy.
Add eggs and vanilla. Mix until well combined.
In a separate bowl, combine flour, salt, and baking soda.
Gradually add the flour mixture to the wet ingredients. Stir until combined.
Using a spatula, fold in the honey graham cracker chunks.
Drop a generous tablespoon of dough (per cookie) onto the greased cookie sheet.
Bake 6-7 minutes or until cookies have a light golden brown color.
Transfer cookies to a cooling rack and let them cool completely.

Drizzle
In a microwave safe bowl, melt peanut butter until it’s of drizzling consistency (I melted two tablespoons at a time and it took about 45 seconds).
Drizzle peanut butter using a fork or spoon over the cookies.
Once the peanut butter drizzle has set, then drizzle the cookies with honey.
Let cookies sit for about 8-10 minutes before eating.

 
Peanut Butter & Honey Graham Cracker Cookies

Double Chocolate Snickers Bundt Cake

Double Chocolate Snickers Bundt Cake Sometimes you just need something over-the-top.

By need, I really mean deserve. As in we’re celebrating my Dad’s birthday and he needs a slice of Double Chocolate Snickers Bundt Cake. Or, I spent the week studying for the GRE and am stressing like crazy, so I need a slice (or, three) of Double Chocolate Snickers Bundt Cake. Or, insert any type of accomplishment, event, or mood (regardless if it’s good or bad) and you need a slice of Double Chocolate Snickers Bundt Cake.

And by that other part, the ‘over-the-top’ part, I really mean something so decadent, so chocolately, so delicious that you won’t even feel guilty eating a slice because it instantly makes everything (and, I mean everything) much better.

Do you see what I’m saying?

Sometimes we deserve to treat ourselves, or need a pick me up, or need to celebrate. Sometimes we need something to make our day a little better, our stomachs a little fuller, and our smiles a little wider. For these days, I usually turn to dessert, and if you’re like me, then I just found us the perfect go to dessert.

Hello Double Chocolate Snickers Bundt Cake. Where have you been all our lives?
Double Chocolate Snickers Bundt Cake

In one word I would describe this cake as rich.  As in, you’re going to need a large glass of milk or a heaping scoop of vanilla ice cream to eat with any slice. The cake itself is extremely moist and chocolately both from the semi-sweet chocolate and the chocolate chips (which, melt slightly while the cake is cooking). The ganache is very rich and velvety, adding yet another chocolately texture to the cake. The caramel and Snickers toppings, which I highly recommend, give the palate a break from all the chocolate and really add the perfect final touches to this decadent dessert.

Double Chocolate Snickers Bundt Cake
Recipe adapted from Williams-Sonoma
Yields: about 16 slices of cake

Ingredients:
Cake
7 ½ ounces semi-sweet chocolate, finely chopped
1 cup cocoa powder + more for dusting pan
1 cup boiling water
2 ½ sticks (20 tablespoons) unsalted butter, cut into cubes
2 ½ cups light brown sugar
5 eggs, lightly beaten
4 teaspoons vanilla
2 ¼ cups all-purpose flour
1 ½ cups of sour cream 

Ganache
6 ounces semi-sweet chocolate, finely chopped
2 tablespoons unsalted butter
½ cup heavy cream

Toppings
About 12 fun-size Snickers, cut into baby cubes
Caramel for drizzling

Directions:
Cake
Preheat oven to 325 degrees. Grease and dust Bundt Cake pan with cocoa powder.
In a medium bowl, combine semi-sweet chocolate and cocoa powder as much as possible.
Add boiling water and whisk until chocolate melts and mixture is smooth and blended. Set aside.
In the bowl of an electric mixer, beat the butter on medium speed until smooth and creamy.
Reduce speed to low and add brown sugar. Beat until just blended.
Increase speed to medium and continue beating the mixture until light and fluffy.
Add the eggs, a little at a time, until well combined.
Add the vanilla. Mix until combined.
In a separate bowl, combine flour, baking soda, and salt.
Reduce speed to low and alternate between adding the flour mixture and sour cream, starting and ending with the flour mixture. Mix until well combined.
Slowly mix in the chocolate-cocoa mixture. Beat until no white streaks are visible.
Using a rubber spatula, fold in chocolate chips.
Pour batter into prepared pan (mine was full to the very top) and bake 65 to 75 minutes or until a toothpick comes out of the center with only a few moist crumbs.
Let cake cool for about 15 minutes upright before inverting the pan and lifting it off the cake.
Let cake cool completely, at least 1 hour (I let mine sit over night).

Ganache & Toppings
In a glass bowl, combine semi-sweet chocolate and butter.
In a small saucepan, over medium-high heat, bring heavy cream just to a boil.
Immediately pour heavy cream over chocolate and butter. Whisk until mixture is smooth.
Pour ganache over top of cake, allowing for some to drip down the sides.
Once the top of the cake is covered with ganache, gently place cubed Snickers pieces all around the top.
Let cake sit until the ganache is set, at least 15 minutes.
Drizzle the top of the cake generously with caramel.


Double Chocolate Snickers Bundt Cake

Mini Pecan Pie Cupcakes

Mini Pecan Pie CupcakesIf I could live anywhere in the world, I would live in—well actually, there are a few places I would want to live, but right now, there is one place at the top of my list—the South.

Whether it’s Georgia, the Carolina’s, Louisiana, Tennessee, Alabama, or any of the other states, I don’t care. I just want to be able to live, breath, and proudly announce that I’m from the South. Don’t get me wrong. I love my home. How could I not? Most of the time we have beautiful weather, beaches are about 15 minutes away, and in terms of leisure activities there is quite a lot to do. But, California does lack in a few areas that the South makes up for.

Which areas you ask? Well, let me tell you.

Country Music Love. Anyone who loves country music is part of the minority here, and since I’m going through a hard-core country phase this is slightly disappointing.

Cowboy Boot Love. I own a pair of red, very cute, if I do say so myself, cowboy boots. How often do I wear them? Not as much as I would like. Why? Because they attract stares, as in, ‘why are you wearing those ridiculous boots, you weirdo ‘ stares. When you’re around country lovers, however, you get compliments on your boots because everyone, girls and boys alike, are rocking their cowboy boots proudly.

Southern Gentleman. You had to know this would make the list. Come on. Boys that speak in an adorable drawl, hold the door open, and wear those nice fitting jeans with a t-shirt and cowboy boots . What’s not to love? Have you seen an episode of Hart of Dixie (which, by the way I just started watching and am completely hooked on) or a picture of Luke Bryan or Blake Shelton?

And, let’s not forget the Food. Specifically dessert. Peach Cobbler anyone? Sweet Potato Pie? Or, how about a heavenly slice of Pecan Pie? I’m guessing you can see where my inspiration for this recipe came from. These cupcakes are probably the closest I’m getting to the South for a while. But, I’m not too upset, because they are pretty darn delicious.

Mini Pecan Pie Cupcakes

These Mini Pecan Pie cupcakes are essentially a bite size version of pecan pie. The cake itself is a shortcake that is extremely moist with a subtle buttery flavor—I think if pie crust could be an actual cake, then it would definitely taste like this shortcake. The mini cupcake is filled to the top with pecan pie filling that is sweet, gooey, and packed with crunchy pecans. Together the pie filling and the shortcake make a perfect pair that will have all your pecan pie cravings filled in no time!

Mini Pecan Pie Cupcakes
Yields: about 27 mini cupcakes

Ingredients:
Cupcakes
1 cup + 2 tablespoons all-purpose flour
2 tablespoons cornstarch
¼ teaspoon salt
1 ¼ teaspoon baking powder
2 eggs, at room temperature
¾ cup granulated sugar
1 ¼ teaspoon vanilla
¼ cup vegetable oil
¼ cup butter, melted and slightly cooled
½ cup milk, at room temperature

Pecan Pie Filling
¼ cup brown sugar
¼ cup granulated sugar
2 tablespoons cornstarch
¼ cup butter, melted
¾ cup light corn syrup
½ teaspoon salt
2 eggs, beaten
1 teaspoon vanilla
1 cup chopped pecans

Directions:
Cupcakes
Preheat oven to 350 degrees. Grease each well of a mini cupcake pan and set aside.
Whip together sugar, eggs, and vanilla until mixture is fluffy, pale, and slightly thickened (about 3 minutes).
Add vegetable oil and melted butter. Mix until well combined.
In a separate bowl, combine flour, cornstarch, salt, and baking powder.
Alternate between adding the flour mixture and milk, starting and ending with the flour mixture. Mix until just combined.
Pour mixture into prepared pan. Bake for 12-14 minutes or until toothpick comes out clean.
Let cupcakes cool completely.

Pecan Pie Filling
While the cake is baking, make your pecan pie filling.
Mix sugars and cornstarch until combined. Pour into a small saucepan.
Stir in melted butter, corn syrup, salt, and eggs.
Cook over medium heat, stirring constantly, until mixture begins to boil.
Remove from heat (if you see small pieces of cooked egg, it means the eggs weren’t beaten enough—pour the mixture through a strainer into another bowl before adding the vanilla and pecans).
Stir in vanilla and pecans.
Let sit for about 10 minutes and then refrigerate for about an hour or until the filling has set.

Assembling Cupcakes
Once the cupcakes are completely cooled, take a knife and cut out a small to medium circle in the middle of the cupcake. Remove the cut out circle from the cupcake.
Using a ¼ teaspoon, dig out the middle part of the cupcake—make sure not to break the bottom of the cupcake.
Once all the cupcakes have been hollowed out and the pecan pie filling has set, use a ¼ teaspoon to scoop the filling into the cupcake.
Scoop enough filling so that the top of the cupcake is brimming with pecans and some of the gooey goodness is drizzling down the side.

 
Mini Pecan Pie Cupcakes

Banana Bread with Coconut and Rum

Banana Bread with Coconut and RumUgly mornings.

That’s what I’ve been waking up to. Gray cloudy skies, a cool breeze, and an instant desire for fuzzy socks, a warm blanket, and a large cup (or three) of gingerbread coffee.

Do you see the problem? It’s way too early in the year for me to be feeling this way. It should be sunny, slightly warm (but, not overly hot…I know, I’m picky), and I should have the desire to jump in the pool, drink iced coffee, and make my breakfast, lunch, and dinner, ice cream (or some other cold treat like popsicles). In the weather’s defense, it does start to heat up around noon, but still, I spend my mornings thinking fall is a lot closer than it actually is.

It doesn’t help that the Hallmark Channel (yes, I watch Hallmark movies, but only after checking to see what’s playing on Lifetime), has been having Christmas movie marathons. And, I of course, sat through about three Christmas movies before turning off the TV. I was getting way too excited about tree decorating, cookie baking, and wearing scarves and boots.

Hello, it’s July. Still Summer. Not fall or December. And definitely not time for Christmas or ugly mornings. What’s a girl to do with all these mixed signals? I’ll give you a hint, it involves baking.

Yup, you guessed right. It is baking this Banana Bread with Coconut and Rum.

Banana Bread with Coconut and Rum

Banana bread, or really any baked bread, makes me think of fall. I think it has something to do with the smell of bread baking in the oven or the need to have a chunky slice with a steaming cup of coffee. Coconut, on the other hand, makes me think of tanning, palm trees, and summer. Can you see how this bread solves my problem? Did I mention that there is rum in the bread? Well, there is, and it pairs quite perfectly with the coconut if you were wondering.

This bread takes banana bread to a whole new (and extremely delicious) level. The bread itself is super moist (thanks to the coconut yogurt) and each bite is filled with a subtle banana flavor, a crunch from the roasted coconut, and an undertone of the cinnamon and rum. I also made the bread with wheat flour (feel free to use all-purpose if you want), which gives the bread a milder taste and combines nicely with the other ingredients. If you’re feeling like fall is invading your summer, or even down the road if summer needs to invade your fall, I’d make this bread. Or, even if you’re just feeling like banana bread, I’d give this recipe a try. It’s worth it. Believe me.

Banana Bread with Coconut and Rum
Recipe adapted from Joy the Baker
Yields: One 9×5-inch loaf

Ingredients:
¾ cup (12 tablespoons) of salted butter, melted, browned, and cooled
2 cups wheat flour
¾ cup brown sugar
¼ teaspoon salt
1 teaspoon baking soda
¾ teaspoon cinnamon
2 eggs
1 teaspoon vanilla
2 tablespoons rum, and about 1 tablespoon for topping
¼ cup coconut yogurt (I used Vanilla Coconut Milk Yogurt from Trader Joe’s)
1 ¼ cup mashed banana (about 3 medium bananas)
½ cup roasted coconut, plus ¼ cup for topping (I used Trader Joe’s Roasted Coconut Chips—recipe will use the whole bag).

Directions:
Preheat oven to 350 degrees. Grease and flour a 9×5-inch loaf pan.
Melt butter in a medium sized saucepan over medium heat. As it melts, the butter will foam and crackle. Stir (or swirl the pan) as the butter cooks. When the butter begins to brown (mine was a very light brown color) and you smell a nutty aroma, take the saucepan off the heat. Pour the butter in bowl, whisk for about 30 seconds, and set aside to cool.
In a large bowl, whisk together wheat flour, brown sugar, salt, baking soda, and cinnamon. Whisk until lumps are gone.
In another bowl, whisk together eggs, vanilla, rum, and coconut yogurt until well combined. Mix in the mashed bananas.
Pour the wet ingredients into the dry ingredients and mix thoroughly. Fold in roasted coconut. Stir until just combined.
Pour mixture into prepared loaf pan and sprinkle roasted coconut on top. Bake for 50-60 minutes. If the coconut on top starts to get too brown, cover loaf pan with foil.
Remove from oven and let cool for 15 minutes in the loaf pan. Brush top of bread with rum as it cools. Transfer bread to a cooling rack to cool completely.


Banana Bread with Coconut and Rum