Banana Bread with Coconut and Rum

Banana Bread with Coconut and RumUgly mornings.

That’s what I’ve been waking up to. Gray cloudy skies, a cool breeze, and an instant desire for fuzzy socks, a warm blanket, and a large cup (or three) of gingerbread coffee.

Do you see the problem? It’s way too early in the year for me to be feeling this way. It should be sunny, slightly warm (but, not overly hot…I know, I’m picky), and I should have the desire to jump in the pool, drink iced coffee, and make my breakfast, lunch, and dinner, ice cream (or some other cold treat like popsicles). In the weather’s defense, it does start to heat up around noon, but still, I spend my mornings thinking fall is a lot closer than it actually is.

It doesn’t help that the Hallmark Channel (yes, I watch Hallmark movies, but only after checking to see what’s playing on Lifetime), has been having Christmas movie marathons. And, I of course, sat through about three Christmas movies before turning off the TV. I was getting way too excited about tree decorating, cookie baking, and wearing scarves and boots.

Hello, it’s July. Still Summer. Not fall or December. And definitely not time for Christmas or ugly mornings. What’s a girl to do with all these mixed signals? I’ll give you a hint, it involves baking.

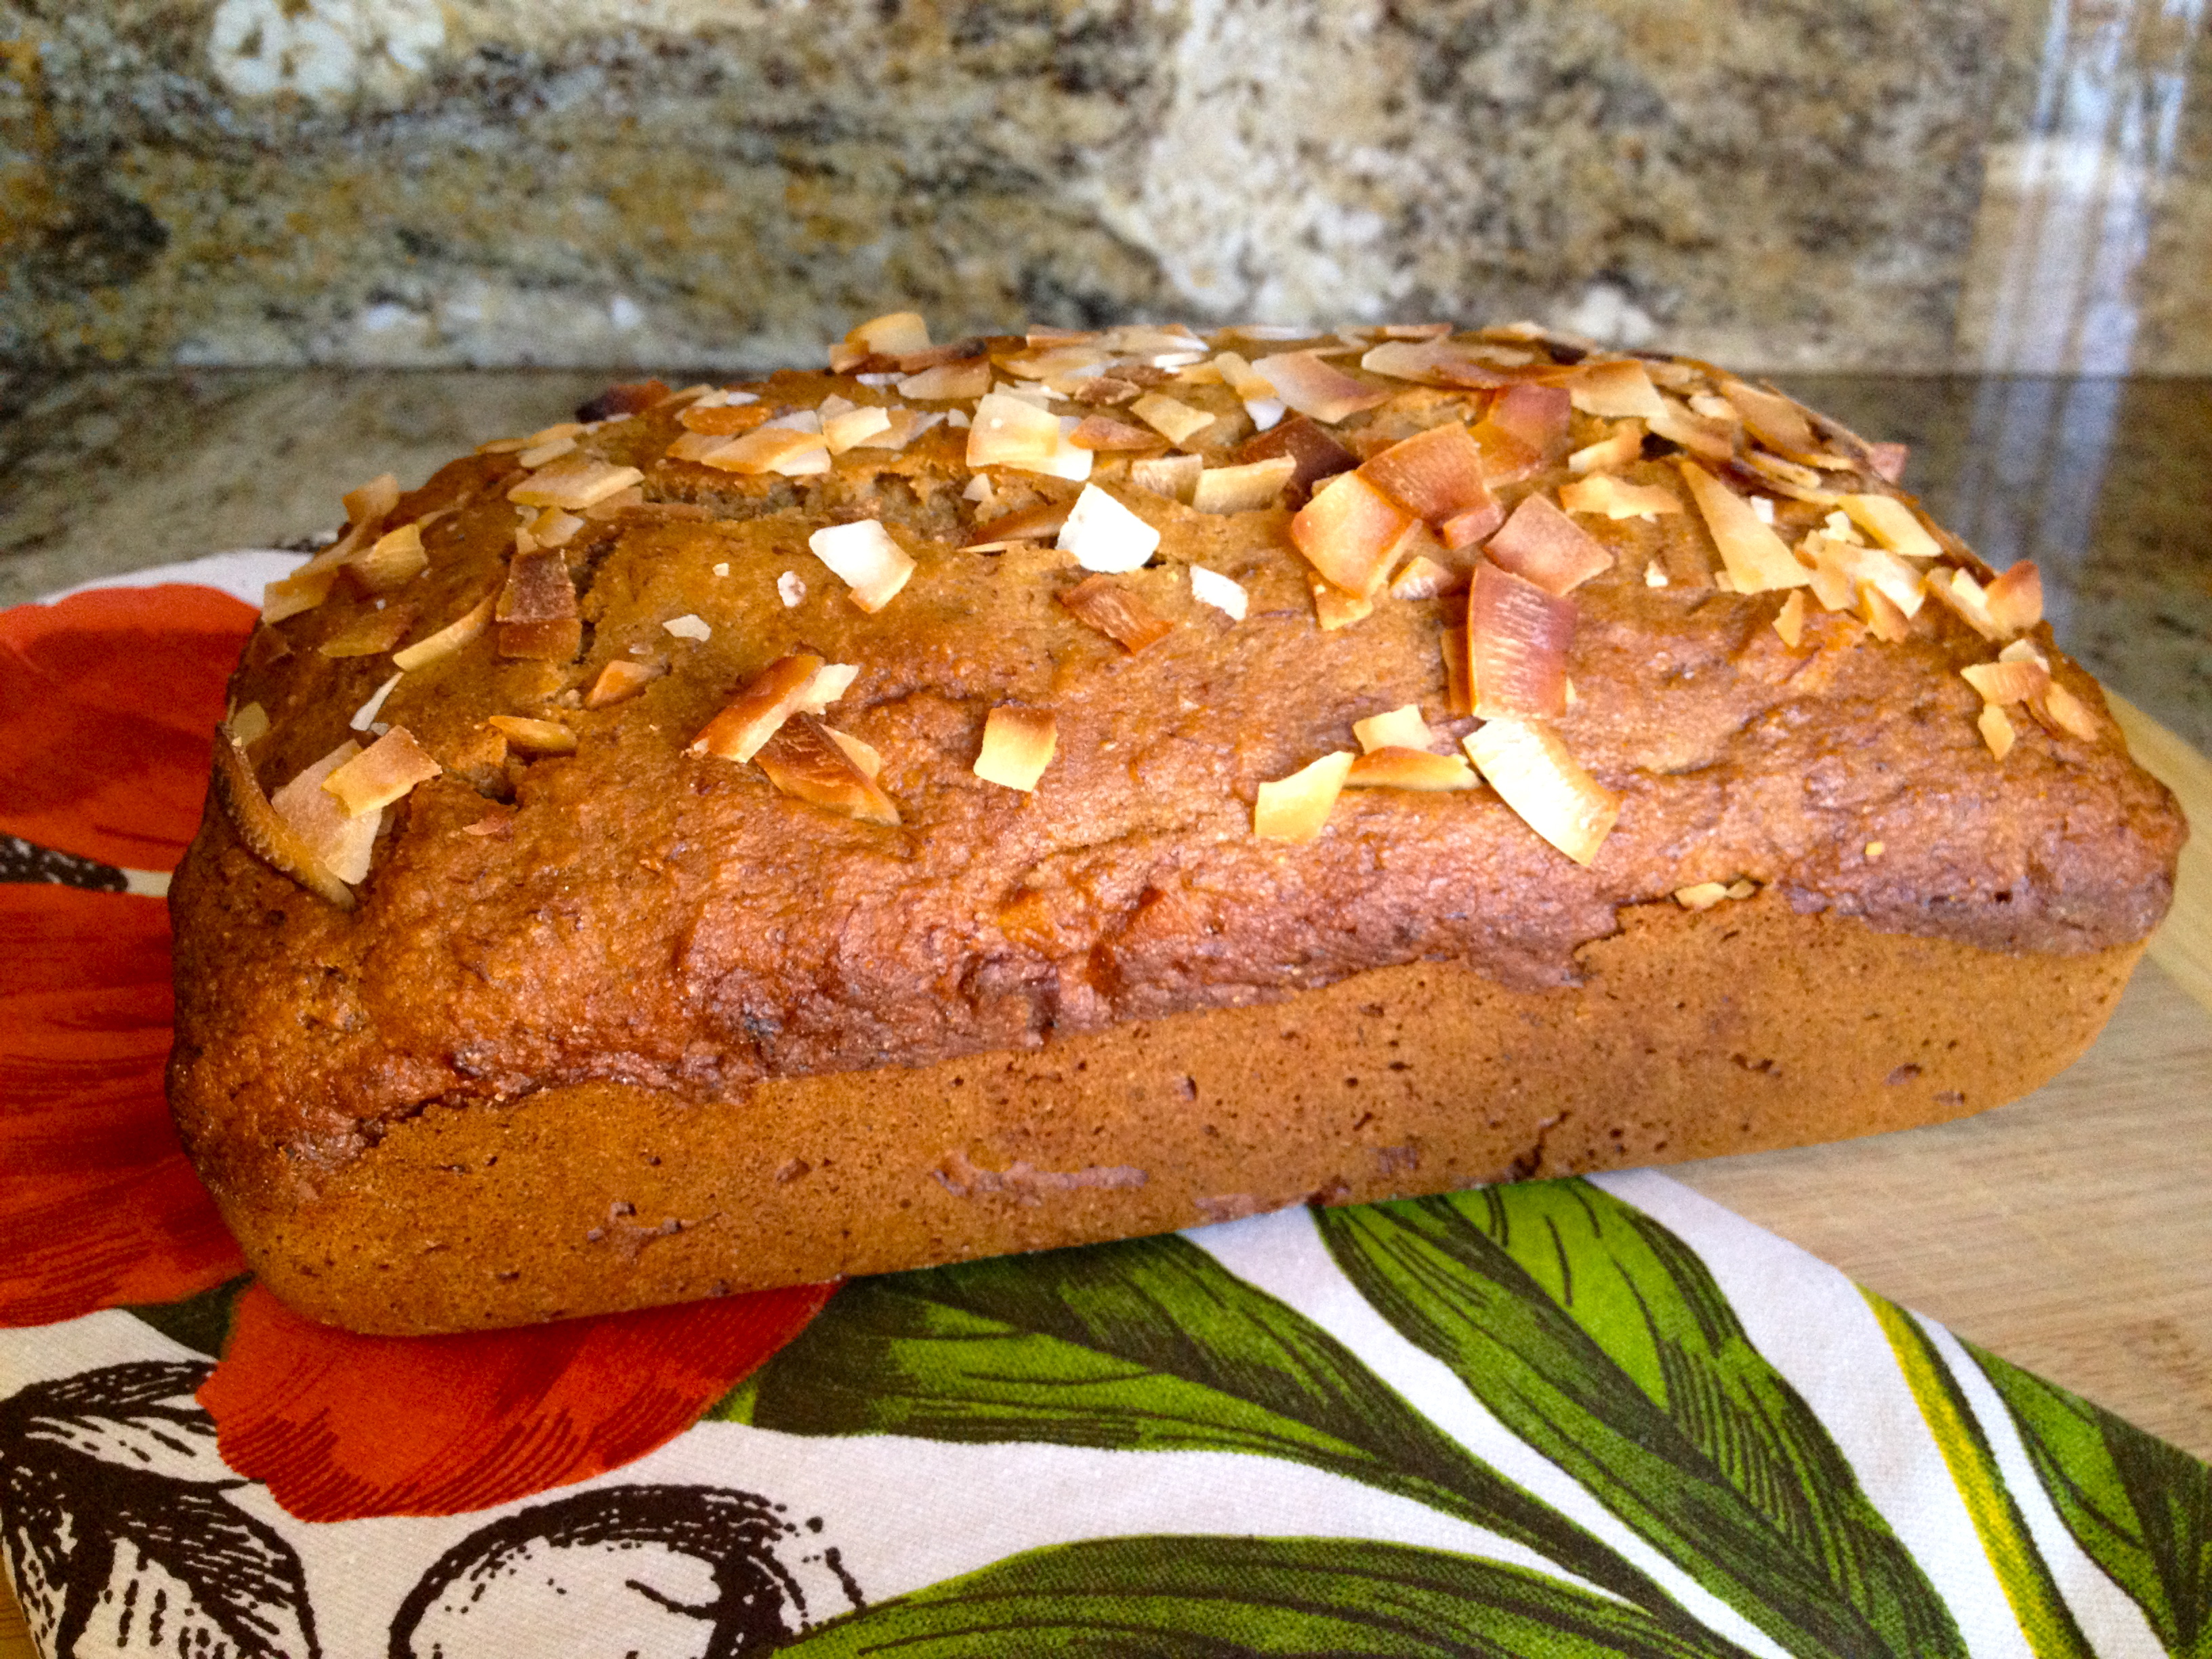
Yup, you guessed right. It is baking this Banana Bread with Coconut and Rum.

Banana Bread with Coconut and Rum

Banana bread, or really any baked bread, makes me think of fall. I think it has something to do with the smell of bread baking in the oven or the need to have a chunky slice with a steaming cup of coffee. Coconut, on the other hand, makes me think of tanning, palm trees, and summer. Can you see how this bread solves my problem? Did I mention that there is rum in the bread? Well, there is, and it pairs quite perfectly with the coconut if you were wondering.

This bread takes banana bread to a whole new (and extremely delicious) level. The bread itself is super moist (thanks to the coconut yogurt) and each bite is filled with a subtle banana flavor, a crunch from the roasted coconut, and an undertone of the cinnamon and rum. I also made the bread with wheat flour (feel free to use all-purpose if you want), which gives the bread a milder taste and combines nicely with the other ingredients. If you’re feeling like fall is invading your summer, or even down the road if summer needs to invade your fall, I’d make this bread. Or, even if you’re just feeling like banana bread, I’d give this recipe a try. It’s worth it. Believe me.

Banana Bread with Coconut and Rum
Recipe adapted from Joy the Baker
Yields: One 9×5-inch loaf

Ingredients:
¾ cup (12 tablespoons) of salted butter, melted, browned, and cooled
2 cups wheat flour
¾ cup brown sugar
¼ teaspoon salt
1 teaspoon baking soda
¾ teaspoon cinnamon
2 eggs
1 teaspoon vanilla
2 tablespoons rum, and about 1 tablespoon for topping
¼ cup coconut yogurt (I used Vanilla Coconut Milk Yogurt from Trader Joe’s)
1 ¼ cup mashed banana (about 3 medium bananas)
½ cup roasted coconut, plus ¼ cup for topping (I used Trader Joe’s Roasted Coconut Chips—recipe will use the whole bag).

Directions:
Preheat oven to 350 degrees. Grease and flour a 9×5-inch loaf pan.
Melt butter in a medium sized saucepan over medium heat. As it melts, the butter will foam and crackle. Stir (or swirl the pan) as the butter cooks. When the butter begins to brown (mine was a very light brown color) and you smell a nutty aroma, take the saucepan off the heat. Pour the butter in bowl, whisk for about 30 seconds, and set aside to cool.
In a large bowl, whisk together wheat flour, brown sugar, salt, baking soda, and cinnamon. Whisk until lumps are gone.
In another bowl, whisk together eggs, vanilla, rum, and coconut yogurt until well combined. Mix in the mashed bananas.
Pour the wet ingredients into the dry ingredients and mix thoroughly. Fold in roasted coconut. Stir until just combined.
Pour mixture into prepared loaf pan and sprinkle roasted coconut on top. Bake for 50-60 minutes. If the coconut on top starts to get too brown, cover loaf pan with foil.
Remove from oven and let cool for 15 minutes in the loaf pan. Brush top of bread with rum as it cools. Transfer bread to a cooling rack to cool completely.


Banana Bread with Coconut and Rum

Peanut Butter M&M Cookies

Peanut Butter M&M CookiesPeanut Butter M&Ms are a staple in my house.

Not a day, or really ten minutes, goes by without a Peanut Butter M&M being consumed.

And that’s not even an exaggeration. In fact, I just ate one.

You see, in my living room, on the coffee table, there are two Mason jars always filled with goodies. The smaller of the two jars is never filled with the same candy; last month it was filled with baby gumballs and this month, it’s filled with dark chocolate covered acai berries (which, if you haven’t tried, you should, because they are amazing…actually, on second thought, they would probably be even better in a cookie…Dark Chocolate Covered Acai Berry Cookies, anyone? Stay tuned for that one). The other Mason jar, the medium sized one, is always filled with Peanut Butter M&Ms.

I don’t remember when that jar became the Peanut Butter M&M jar. My mom uses the Mason jars as decoration and the candies were simply supposed to add a touch of color to the room. Sure, guests that came over could enjoy a chocolately snack, but I don’t think she intended for my family to be doing the bulk of consumption. In our defense, my mom made it a little too easy for us to snack on them. The jar is positioned perfectly between both couches, so that a simple stretch of the arm can get you a handful of peanut butter chocolate heaven.

See, we can’t be blamed. You’d probably do the exact same thing.

Peanut Butter M&Ms seem to be everyone’s favorite candy, without people actually realizing that they like them. What I mean, is that people, like my brother, Matt, who don’t like peanut butter, will sit there and single-handedly devour the entire contents of the jar without even breaking a sweat. Anyone who sits in our living room for more than five minutes reaches for the Peanut Butter M&M jar and if, by chance, we are out of Peanut Butter M&Ms their faces show the disappointment. Clearly, Peanut Butter M&Ms are candy gold. And that’s why I had to put them in a cookie. And, let me just tell you, I’m happy that I did.

Peanut Butter M&M Cookies

I’ve never baked with M&Ms before. I figured why mess with something that tastes pretty darn good by itself. But, boy was I wrong. These cookies taste just like a handful of Peanut Butter M&Ms, so if you like those, you’ll love these cookies. The cookie itself is super moist and chewy, and the dough has a subtle creamy peanut butter taste that adds to the softness of the cookie. Each bite is filled with a slight crunch from both the instant oats and the M&Ms as well a hint of chocolate from the M&M coating and a smooth peanut butter taste from the inside of the M&M. If you’re thinking it’s too much peanut butter, don’t, because even Matt, the supposed non-peanut butter lover, likes these cookies. I suggest pouring yourself a tall glass of milk and grabbing a handful of these cookies.

Peanut Butter M&M Cookies
Recipe slightly adapted from Sally’s Baking Addiction
Yields: 25 cookies

Ingredients:
½ cup (1 stick) salted butter, at room temperature
¼ cup sugar
½ cup brown sugar
¾ cup creamy peanut butter
1 egg
1 teaspoon vanilla
1 ¼ cup all-purpose flour
½ teaspoon baking soda
½ cup quick oats
¾ cup (1 medium sized bag) Peanut Butter M&Ms

Directions:
Preheat oven to 350 degrees and spray a cookie sheet with cooking spray.
Cream together butter and both sugars, until light and fluffy.
Add the peanut butter, egg, and vanilla. Mix until well combined.
In another bowl, combine the flour and baking soda.
Gradually add the flour mixture to the wet ingredients. Stir until combined.
Fold quick oats and M&Ms into mixture.
Drop a generous tablespoon of dough (per cookie) onto the greased cookie sheet.
Bake for 9-10 minutes.
Transfer cookies to a cooling rack and let them cool for about 10 minutes (if you can wait that long) before eating.

 Peanut Butter M&M Cookies

Dirty Chai Bites

Dirty Chai BitesI’m a Starbucksaholic.

Yes, that is a thing. And no, I didn’t just make that up. I personally know quite a few members, my mom included.

What exactly is a Starbucksaholic? Well, let me tell you. We are Starbucks lovers. And by lovers, I mean we go to Starbucks everyday, sometimes even two times a day, but never more than four times a day (we do have standards, after all). Baristas seem to know our names, life stories, and our orders.  We our gold card members (I’m almost at that level!), have the Starbucks app on our phones, and can spot a Starbucks two miles away (our coffee senses start to tingle). We also solve most of our problems (bad moods, headaches, breakups, ect.) by ordering a venti of our favorite drink and sitting with a fellow Starbucksaholic outside the store.

If you’re a coffee lover, I’m sure you understand, and I recognize that you may in fact be a Peetsaholic or if you’re from back East, a Dunkindonutsaholic, but either way we’re in the same boat, the ‘we-love-coffee-and-we-know-it’ boat. If you don’t love coffee, that’s okay, you can still come on our boat, judge free. I promise. We’ll serve you tea or hot chocolate.

Starbucksaholic also tend to have favorite drinks. Mine, in particular, is a Dirty Chai with soymilk.

Dirty Chai Bites

If you haven’t tried a Dirty Chai with soy, I suggest you jump in the car and drive to the closest Starbucks immediately. This drink will blow your mind. It is the perfect combination of chai spices, subtle coffee flavoring (in case you didn’t know, dirty means one shot of espresso), and vanilla from the soymilk. Whether it’s hot, iced, or blended (yes, they do Dirty Chai Frapps) you can’t go wrong. I also like to add a bit of cinnamon to the top of my drink, which seems to add the perfect final hint of spice to the drink. Even non-coffee lovers seem to like this.  And that’s saying a lot.

Anyways, I figured I should be able to drink my Dirty Chai and eat it too.
Dirty Chai Bites

Hello, beautiful Dirty Chai Bites.

Coffee and non-coffee lovers alike can unite over this dessert. These bites, in two words, are deliciously addicting. The bite itself has a soft and moist donut base that is infused with both subtle chai spice and a hint of coffee. The outside of the bite is dunked into a coffee glaze, which balances the sweetness from the sugar and the strong flavor of coffee perfectly. The top of the Dirty Chai Bite is sprinkled with cinnamon, and just as it does with the drink, it adds the perfect hint of spice.

Fair warning, once you start eating these bites, you won’t be able to stop, especially since they’re mini and you convince yourself one, or maybe four more, won’t hurt.

Dirty Chai Bites
Recipe adapted from Country Cleaver
Yields: 48 Dirty Chai Bites

Ingredients:
Dirty Chai Bites
½ cup granulated sugar
1/3 cup unsalted butter, at room temperature
1 egg
½ teaspoon vanilla
¼ cup strong coffee, freshly brewed and cooled
1 ½ cups all-purpose flour
1 teaspoon baking powder
½ teaspoon salt
1 oz. (3 tablespoons) powdered chai (I used the Trader Joe’s Spicy Chai Latte Mix)
½ cup milk

Glaze & Topping
4 tablespoons strong coffee, freshly brewed and cooled
1 cup powdered sugar
1 teaspoon cinnamon

Directions:
Dirty Chai Bites
Preheat oven to 350 degrees and spray a mini muffin pan with cooking spray.
In a medium bowl, beat together the sugar and butter, until light and fluffy.
Add the egg and vanilla. Mix until well combined.
In a separate bowl, combine flour, baking powder, salt, and powdered chai.
Add the coffee to the wet ingredients. Pour in some of the flour mixture, until the coffee is incorporated.
Alternate between adding the rest of the flour mixture and milk, starting and ending with the flour mixture. Mix until well combined.
Scoop a tablespoon of the mixture into each muffin well.
Bake for 10 minutes, or until light golden brown.

Glaze & Topping
While the dirty chai bites are baking, make the coffee glaze.
In a small bowl, whisk powdered sugar and coffee until mixture is runny and sugar is dissolved.
Let bites cool slightly before dunking the tops of the bites into glaze. Turn right side up and sprinkle with cinnamon to set. [Note: since the bites have a muffin top, some of the glaze will run off as they set, but you’ll have enough glaze to do a second dunking if you want more glaze on the bite].


Dirty Chai Bites

Red Velvet & Cream Cheese Cookie Stack Cake

Red Velvet & Cream Cheese Cookie Stack Cake I’m still new to this blogging thing.

And, I’m learning that it’s a little harder than I thought it would be.

Posting weekly isn’t so bad; just bake something, take pictures, and post. Easy right? Mostly right. It gets harder when life things, like graduation, moving, packing, traveling, celebrating, and unpacking, interrupt your normal routine. Hence, my lack of posting in the past two-ish weeks, which I hope you’ve forgiven me for (and if you haven’t, I promise this recipe will make up for it).

The other thing about blogging that can be an issue is pictures. What’s so hard about taking a few artsy pictures? Nothing really, except that sometimes your friends and family get so excited about what you made (I can’t really blame them on this one…it is, after all, a dessert within a dessert), that they start eating it before you get the chance to have a dessert photo shoot.

It gets even harder, when your parents throw you a surprise graduation party (thanks Mom and Dad!!) and in all the commotion, you don’t get a single photo on your camera. Thankfully, Mom and Grandma take pictures like crazy (it’s actually part of their job descriptions) and my best friend snaps a few because, well, she thinks anything with red velvet needs to be photographed (this probably explains why we are friends). The end result is a few different pictures from different cameras of this deliciously, over the top, cookie stack cake.

Red Velvet & Cream Cheese Cookie Stack Cake

This cake takes red velvet to a whole new level. Typically when you eat red velvet cake, the cream cheese frosting is only found on the top. By the last bite of cake, you’re left with no frosting and a craving for a hint of cream cheese. However, the only thing you’ll be craving by the last bite of this cookie cake is another slice. Soft and moist red velvet cookies are sandwiched in between layers of cream cheese frosting resulting in a cake slice that isn’t overly sweet, but still sweet enough to satisfy all your dessert cravings.

Also, if you’re looking for a cake that will have people applauding and asking for seconds for your Fourth of July celebrations, this is your recipe. The red and white colors are visible and you could alternate between doing white and blue cream cheese frosting to cover all three colors if you wanted!

Red Velvet & Cream Cheese Cookie Stack Cake
Cake Concept adapted from Erica’s Sweet Tooth

Ingredients:
Red Velvet Cookies
2 boxes red velvet cake mix
4 tablespoons all-purpose flour
1 cup vegetable oil
4 eggs
2 teaspoons vanilla

Cream Cheese Frosting
8 oz. package cream cheese, at room temperature
½ cup unsalted butter, at room temperature
2 cups powdered sugar
1 teaspoon vanilla

Directions:
Red Velvet Cookies
Preheat oven to 350 degrees.
Combine cake mix and flour.
Add oil, eggs, and vanilla. Mix until smooth.
Scoop about a tablespoon of dough (per cookie) onto an ungreased cookie sheet.
Bake for 10 minutes.
Transfer cookies to a cooling rack and let them cool completely.

Cream Cheese Frosting
Once the cookies are completely cooled, make your frosting.
Beat together cream cheese and butter, until creamy.
Slowly add powdered sugar, mixing until well-combined.
Add vanilla. Mix until frosting is fluffy.
Transfer frosting to a Ziploc bag. Snip off the corner (or, you can use a decorating bag with a large tip).

Assembling the Cake
(Note: If you work better with a visual on assembly, rather than just words, visit Erica’s Sweet Tooth)

Arrange six cookies in a circle on your cake plate. Place a cookie in the center.
Pipe a ring of frosting around the six cookies, leaving the center cookie free of frosting.
Layer six more cookies on top of your base layer, placing them to cover the slightly open gaps between the cookies on the base layer. Leave the center empty of a cookie this time.
Pipe another ring of frosting around the six cookies. Then, fill the center space completely with frosting.
Continue building layers, following the above steps, until your run out of frosting.
I used about 40 cookies for layering and crumbled one on top for decoration.
The cake isn’t meant to be perfect, so just take one layer at a time!

 
Red Velvet & Cream Cheese Cookie Stack Cake